Friday, August 31, 2012

Bring the Family Together with an Indoor Garden

I'd like to welcome Jack Mauro who has written a post especially for DIYbyDesign.  Enjoy!


Are you looking for a fun way to get the family to spend time together creating something that the whole house can enjoy? Why not set up an indoor garden! Gardening is a fun, low-stress way to fill the house with beautiful green growing things. Depending on what you choose to grow, you can either enjoy the beautiful smell and appearance of your plants, or you can harvest them for 
delicious home-cooked meals.

How to Create Your Indoor Garden - Prep Work

Image Source: Martha Stewart.com 

The first step is to choose your spot. You will want a place that gets plenty of sun, so near a window or sliding glass door is always a good choice. If your home has skylights, these are perfect for your indoor garden. In the event that there are no sunny spots inside, you can always purchase fluorescent grow lights for your plants to help them get the nutrients they need. Alternately, you can plan to garden only with plants that require partial sun.

Once you have a space to set up your garden, get everything you need to buy. This will include a Rona gardening trowel, seeds or seedlings, planters, drainage saucers and potting soil. A gardening spout or can is also a good buy. Make sure to buy planters that fit the size of the plants you're getting. 


How to Create Your Indoor Garden – Planting


Image source: SheKnows.com

Once you have all your things together, then the fun part begins!

1- Fill the planters with soil and place them on top of drainage saucers.
2- If you've purchased seedlings, dig a hole large enough for the seedling to fit, carefully remove the seedling from the pot it came in, and gently dig out the bottom so the roots are free.
3- Place the root ball in the hole and fill it back up with soil, burying the roots completely.
4- If you've purchased seeds, simply plant one as deep as the seed packet suggests.
5- You may be able to plant multiple seeds in the same planter. Be sure to space them apart in accordance with the instructions on the seed packet.
6- Finally, water the soil thoroughly until you see water begin to drain into the drainage saucer.

Caring for Your Indoor Garden

Image Source: 16hstreetj.com

Nature is beautiful in that it tends to grow all on its own. This is the perfect lesson for young children, who will be excited to see little sprouts and to track the plant's growth progress. You can tell them how its growth is just like their growth and watch their little eyes get all big! Be sure to caution them about being too rough with your new plant.

If the plant begins to get too big for its initial planter, replant it the way that you initially transplanted the seedling from one pot into the planter.

For the first couple weeks, you be in charge of watering duty. Have the kids watch you do it so they can learn the proper technique. Water your plants according to the instructions on each seed packet. Once the plant is acclimated to your home and is strong enough to handle the occasional over-enthusiastic child, you can have your kids water it as part of their chores.

Having a plant will help your children learn the value of responsibility, as they will be caring for a living creature. This can be an important educational lesson for your kids. Even though the plant does not move around, it is still alive and must be treated with respect. Indoor gardening can bring you and your entire family together. Try it out today!

 Thanks Jack!  

Have a great Labor Day weekend everyone.  

-Judy

Thursday, August 30, 2012

Tumbled Marble Coaster Tutorial

Here is one of my favorite tutorials from last year.  Enjoy.

I have been wanting to make my own coasters for a while now.  We have a box of left over tumbled marble tiles in our garage from our kitchen backsplash which I knew would be perfect for this project.
Do you like my new Le Creuset tea kettle?  It's in my favorite color.
 I started by going to The Graphics Fairy, and picking out four french designs that would reduce to 4"x4" easily.  It's important that you don't pick a design that is too wide or else it will cut off part of the design when you reduce it to 4"x4".  Next I printed out the mirror image of the design on my printer (you need it to be the mirror image of the design since that is the part that will be sticking to the tile).
There are so many different ways to transfer a design onto tile.  I wanted to do this entire project without having to leave the house to buy anything, so I went with this method. 
I cut out the design and brushed mod podge onto the printed side of the paper.
I then placed it on top of the tile and smoothed out the paper.
I baked the tiles at 170 degrees for 20 minutes.
When the tiles came out, I wet my finger and started to rub off the paper. 
 Do not soak the paper or else you will wipe off the ink as well.  
You just have to keep wetting your finger and wiping off the back of the paper a little at a time.  
You can see in this photo that I had a little bit more to wipe off.
It took only a few minutes to get it all off.
Once all of the backing of the paper is off, it is time to polyurethane.
I brushed a thin layer of polyurethane on top of each tile to protect it 
from any moisture from drinks placed on it.  
Once the polyurethane was thoroughly dry (a few hours), I added self stick cork to the bottom.  
If you don't have self stick cork, you can use felt.  
You just want to ensure that the tiles won't scratch the top of your furniture.
It was only 11am when I took this photo...too early for wine...so it's fruit juice.  Lol
Time to enjoy my new coasters.
These would also make a great gift.   

Can't wait to hear what you think.
-Judy
Pin It


Tuesday, August 28, 2012

Sizzle into Summer - It's a Party #80

Welcome to this week's Sizzle into Summer.  As the summer winds down, I am running around trying to get the kids ready for school.  They go back next Wednesday and things seem a bit crazy around here.  Last week's party was filled with tons of inspiration.  Here are this week's features:

HOME DECOR:
Beaux R'eves  shared the gorgeous room she stayed in while in Monterrey, California.  Just stunning!!
Hope you stop by to check out the rest of her photos from her vacation.
My friend Marty, over at A Stroll Thru Life, infused my favorite color of aqua into her living room.  I love the softness it adds to an already gorgeous room.

FURNITURE MAKEOVERS: 
Lilyfield Life transformed an Ikea file cabinet by adding chalkboard paint to the drawer fronts.  
Super cool project.
Makin My Apt a Home  revealed her new "Donna" dresser.  I love that she named it.  Hope you will check out all of the before and after photos.

CRAFTY CREATIONS:
Sarah Saturday created this super cute owl wall art.  I just love owls.

Life on Lakeshore Drive created this beautiful bird's nest art.  I just love the colors.  

TASTY TREATS:
Cozy Home Scenes  shared something a little different - canine turkey burgers.
Now there's some pet love.
Scattered Thoughts of a Crafty Mom  shared her recipe for microwave potato chips.  Now that sounds yummy and easy.  The best combination.

If you were featured, please grab an "I've Been Featured" button (you can now find my buttons by clicking on the buttons tab right under my header).  Now let's get started with this week's party.  I can't wait to see what you have been up to.  Link up anything you have been working on...home decor, sewing, crafts, organizing, baking, recipes etc.   I will keep this link open through Friday.


A few rules:
1.  Please become a follower (if you already follow me on Google, I would love for you to follow me on Linky Followers as well).  

2.  Please grab my party button above and display it either on your sidebar or somewhere in your post.  This way word can spread about the party.  The more people at the party, the more fun we will have.

3.  Please enter the link to your actual post, not just a link to your main blog page.

4. Please visit others who have linked up.   Everyone works hard on their projects and blogs...let's show each other some love by visiting each other.  Let's have some fun and hopefully make a few new friends along the way.

Ok...Let's Party

-Judy

How to Make a String Bracelet

Last week we were in Cape Cod.  A Cape Cod vacation is filled with days at the beach.  We were with my brother-in-law, his two sons and his girlfriend as well as my mother-in-law.  My brother-in-law's girlfriend brought along an entire kit of fun for us.  She figured me and my daughter would love to make bracelets with her.  What she didn't count on was that all of the kids, even the three boys, would become obsessed with making these bracelets on the beach.
She had an awesome box of embroidery thread to choose from as well as samples of all the bracelets we could make.  She created this kit when she was my daughter's age.
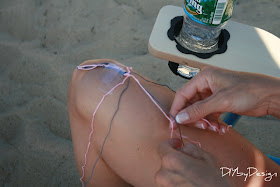
Here is the one of the ankle bracelets I made.  This is one of the easier stitches.  
Here's all you have to do.
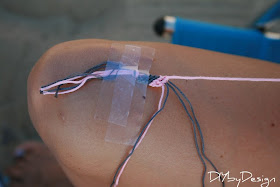
First determine how wide you want the bracelet to be.  This was a six string bracelet.  I used three pink and three gray.  I tied all six together with a knot and taped it to my leg.  Arrange the string so that the three pink and the three grey are next to each other.  The tape was a great idea.  When I used to make these, I would attach the bracelet I was working on to the inside of the plastic case.  This was much easier and I would just add more tape and the bracelet got longer.
 It just makes the stitches more uniform.

Starting on the left, take the first string and make the number "4" over the next string.  
Tie off two knots this way.  

Simply continue with that string over the next five strings.  When you get to the end, start again with the next string all the way to the left.  It's really that easy.
Just keep doing this over and over again until you get to the desired length (a bracelet is shorter than an ankle bracelet, so you can be done faster :)).  
The kids really got into making these bracelets.  By the end of the trip they were cranking out a few a day.  It was a great way to spend some beautiful days at the beach.

DON'T FORGET TO STOP BACK TONIGHT AT 8PM EST 

FOR MY SIZZLE INTO SUMMER PARTY

-Judy
Pin It

Monday, August 27, 2012

$250 Office Supplies Giveaway

Good news!
  Whether you're a blogger or a business entrepreneur or just want some office supplies for personal use, I have an awesome opportunity for you.  DIYbyDesign is hosting a huge office supplies giveaway contest.  DIYbyDesign has teamed up with 123Print.com to giveaway $250 worth of office supplies to one lucky DIYbyDesign reader. Yep...$250!!

  123Print.com is a leading provider of high-quality customized printing for businesses, weddings and personal use.  Maybe you have an etsy business that could use some business cards or stationary.  Maybe you or someone you know is planning a wedding and could use wedding invitations.  Whatever your needs, $250 will go a long way at 123Print.com.

Here’s how to enter the 123Print $250 Office Supplies Giveaway: 

1. Please stop by 123Print and come back and leave a comment below telling me which supplies you would get and how you will use your supplies and how you would use other promotional items that you can see on 123Print.com.  It's that easy. 

2.  For a second chance to win, like 123Print on facebook and leave a separate comment letting me know that you did.  

  The giveaway will close on Monday September 3, 2012 at 11:59pm EST.  You must leave a separate comment for each entry in order to maximize your chances to win.  If your email address is not linked to your Google account, please make sure to include your email in your comment so you can be contacted in the case you win-otherwise a new winner will be selected. US residents only. The print order must be placed within 30 days of receiving the prize notification email from 123Print. 

 Good luck!!

-Judy

Friday, August 24, 2012

Conquering Fear

We are in Cape Cod this week and have been enjoying a wonderful vacation.  Our Cape Cod vacations usually consist of tennis, beach and dining each day.  Very fun and very relaxing.  However, yesterday we did something a bit different - we went parasailing.  I can honestly say that I have never had any real desire to go parasailing.  My husband has been talking about it for months.  He wanted to take my fifteen year old son when we were in the Caribbean earlier this summer, but it just didn't work out.  Well, it worked out here.  Like I said, I had no intention of going parasailing.  My son and my husband were very excited.  My twelve year old daughter was another story - I think she really did want to go, but was just afraid.  One of the many mottos I have with my kids is to never have fear hold you back from doing something you want to do.  So I made my daughter a deal.   If she wanted to go, I would go up with her and we would conquer our fear together.  

 My husband and son went first.  The worst part was the anticipation before it was our turn.  Once my son and husband landed safely, my daughter and I went and sat on the back of the boat and they clipped us onto the bar.
 Then you just start flying away from the boat.  No warning...no are you ready...no one, two, three, go...you just take off.
It's the weirdest, coolest sensation.  You fly 500 feet above the water.  When you're in the boat waiting, it's windy and a bit loud with the engine roaring.  When you're up in the air it's almost silent.  My daughter and I were up there talking the whole time.  We each were holding onto to the straps like it was a life line.  Halfway through the ride my daughter asked me if I thought we were supposed to hold on this tight.  Her arms were shaking and hurting (as were mine).  She got brave first and let go with one hand to wave.  Then I tried too.  We could see everything from up there.  We are here with my brother-in-law and his family and we could see them jet skiing below us.
It was a very beautiful view of Cape Cod.
It's a super gentle ride.  There were some parts where the wind pushed us a little, but mostly it was very calm.  I looked over at my daughter a few times, but that was when I discovered just how high we were.  I also realized around that time that I had forgotten to take off my sunglasses.  As it turned out that was okay.  Nothing happened to them.  

As fun as it was, we both were very happy when they started to pull us back in.
Today we will be back at the beach just relaxing! :)

What fears have you conquered lately?
Have a great weekend.
-Judy
Pin It