Ever since I received an embroidery sewing machine for Christmas,
I have wanted to make a new bolster pillow for my daughter's room.
Honestly, I don't need much of an excuse to make something girly and new for her room.
Honestly, I don't need much of an excuse to make something girly and new for her room.
I bought a flat twin white sheet from Walmart for $5.00.
Twin sheets are so perfect for making projects like this and you can't beat the price.
Twin sheets are so perfect for making projects like this and you can't beat the price.
I'm getting better at using my embroidery machine. I found out that if you read the directions and actually follow them to the letter that the machine really works wonderfully. Lol
I just chose a pretty font and let my machine do the rest.
I just chose a pretty font and let my machine do the rest.
I used actual embroidery thread this time (in my first few attempts with the machine I was using regular thread). I love the sheen of the embroidery thread. Embroidery thread is significantly more expensive than regular thread, but I definitely see the benefit. I used regular thread in the bobbin.
Once it was done I laid out the design I wanted around it.
I tend to work on the floor in my hallway when I have to lay out sewing projects.
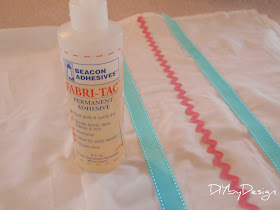
Using ribbon and ric rac I had already, I adhered it to the fabric using Fabri-Tac. To me, this is the absolute best fabric glue out there. It adheres immediately. I decided to use fabric glue rather than sewing it on because I didn't want stitch lines. Once all my ribbon was adhered, I sewed it right sides together to the size of my bolster pillow.
I really chose the easy way out this time and simply gathered the ends
and held it in place using a hair tie.
I only had to finish off one end of the fabric since one side was the finished edge of the sheet.
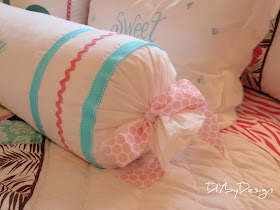
I then tied a bow on each end with pink polka dot ribbon.
Here is the finished bolster pillow.
Here is a close-up.
I LOVE LOVE LOVE how this came out.
It picks up the colors in my daughter's comforter perfectly.
I can't wait to hear what you think of this project.
I'm really loving my embroidery machine!!
Don't forget to get together your spring projects, recipes and decor this weekend for the
Bunny Blog Hop on Monday. Remember there will be an awesome giveaway at the party as well.
It's going to be a hopping good time!!
Have a great weekend!
I tend to work on the floor in my hallway when I have to lay out sewing projects.
Using ribbon and ric rac I had already, I adhered it to the fabric using Fabri-Tac. To me, this is the absolute best fabric glue out there. It adheres immediately. I decided to use fabric glue rather than sewing it on because I didn't want stitch lines. Once all my ribbon was adhered, I sewed it right sides together to the size of my bolster pillow.
I really chose the easy way out this time and simply gathered the ends
and held it in place using a hair tie.
I only had to finish off one end of the fabric since one side was the finished edge of the sheet.
I then tied a bow on each end with pink polka dot ribbon.
Here is the finished bolster pillow.
Here is a close-up.
I LOVE LOVE LOVE how this came out.
It picks up the colors in my daughter's comforter perfectly.
I can't wait to hear what you think of this project.
Don't forget to get together your spring projects, recipes and decor this weekend for the
Bunny Blog Hop on Monday. Remember there will be an awesome giveaway at the party as well.
It's going to be a hopping good time!!
Have a great weekend!
-Judy


Oh that is so pretty, Judy! That pillow turned out wonderfully and it looks so sweet on your daughter's bed. Super job!
ReplyDeleteJudy what a great project and tip on the sheet.
ReplyDeleteLove the bolster pillow!
I love this its so pretty! I have been wanting to make a bolster pillow for my own room...what did you use to stuff the pillow with to make it so even shaped?
ReplyDeleteI LOVE IT Judy!! Her room is so pretty!
ReplyDeleteVery precious :) what a great space. Have a great weekend.
ReplyDeleteI LOVE it, Judy! I love how you used colors to tie into her room and the script you used for her name is really nice. Yes, I guess actually reading directions helps ~ I'm very bad at that. : ) I've put getting a new machine to the side for the moment, but seeing your embroidery has it back in the front of my mind.
ReplyDeleteSo cute...and her bedroom is just adorable!
ReplyDeleteI love the pillow. Her bedroom is adorable . Very pretty colors.
ReplyDeleteVery cute! I could never figure mine out so I sold it. Love the pillow!
ReplyDeleteYou are just too talented Judy! I can hardly sew a straight line, let alone make something so gorgeous! It matches perfectly with her room. Going to share this one on our Facebook Page!
ReplyDeleteHeather
Wow...Wow... Wonderful work.... Lovely colors ... Luv the finishing touch added with the ribbon... And your girls room looks soo beautiful !!!
ReplyDeleteThat is so sweet! I saw it featured at a party and thought, hey, I would still like that at my age. LOL. The colors are so pretty and your daughters room is just wonderfully delightful! What a lucky girl =)
ReplyDeleteOhmygoodenss! It looks amazing! The whole room looks right out of magazine! Beautiful Judy!
ReplyDeletexo Becca
This is adorable! I love the room too, so pretty. Thanks for sharing at Terrific Tuesdays.
ReplyDeleteRachel
adventuresofadiymom.blogspot.com
Stopped by before and I have to say I am still loving this pillow! Thanx for coming to THT! Hope your Friday is fabulous!
ReplyDeleteHi Judy!
ReplyDeleteI wanted to let you know that I featured your pillow today - stop by and see! Grab a featured button as well! Thanks so much for linking up to my party!
Stacey of Embracing Change
Judy, the pillow turned out so cute for your daughter. Her room looks so fun and cozy. I bet she's a cutie like her mom. Thanks for sharing this with my party. Hope to see you again this week!
ReplyDeleteHugs,
Jann