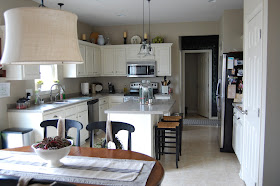
Today I'm sharing a project that I completed earlier this year and it has made a BIG impact on the entire feel of my kitchen! I chose this project because I think sometimes we can shy away from things that go a step beyond paint, and might seem like they have more of a "construction" element because they are intimidating. I'm here to show you it can be done, and relatively easily! Trust me. Check it out: So I painted my kitchen cabinets just before the holidays (and I am still so thrilled with them B-T-Dubs)
Snazzy, right? But there was something missing. My kitchen island is fantastic in so many ways: it's a great size, has ample storage and we use it a ton for entertaining, crafts and food prep. But it left a little to be desired in the "good looks" department. Here's a before, pre-paint:
See? Um, yeah. Like a lot of standard kitchen and bathroom cabinetry, the face of all our cabinets is nice quality wood. The sides, however, are veneer engineered to *look* like the oak... a much cheaper product that is pretty common. I always hated the look of those sides, so I was more than happy to paint over it when I painted the rest of the cabinetry. The paint was definitely an improvement, however the veneer doesn't take paint as well as real wood does, even with a good primer.

On the ends of my base and upper cabinets, I added bead board wallpaper to hide the veneer and add a little texture (just like I did in this bathroom). But in our house, the kitchen island is a hardworking fixture, and I knew that if I used the wallpaper, it wouldn't be long before it was scuffed or dented or torn. The island needed something a little more durable that could really take a beating but still maintain its integrity. I loved the bead board look, so I went to Home Depot for the real-deal. I had planned on purchasing pre-primed MDF bead board panels, but was able to find real oak panels on sale for less than the MDF so I jumped on that! They typically run (regular price) around $14 a panel. To save time and labor, I took my measurements with me and had my handy Home Depot associate cut my panels for me there in the store. This is a super service AND IT'S FREE. Step 1 in eliminating the construction-intimidation factor if you're afraid of mis-measuring. Those guys are good. :)

I also picked up two of these half-newel posts.
You'd find a full newel post at the end of your stair banister. These are cross cut so that one side is completely flat and can be put flush against a wall.
I started by adding the bead board panels to the sides and securing with liquid nails (use the version meant for indoor woodworking projects. It goes on super smoothly and dries super quickly) while my husband lent a hand and removed the quarter-round shoe trim from the backside of the island. One thing I liked about the island's original design is the quasi-board and batten look on this side of the island. I planned to keep that, but add bead board detail to the inside of the 'boxes'
I used liquid nails once again to secure the newel post flush against the edge of the island (you'll note I trimmed down the posts to fit under my counter. I lopped off the ball on top and also trimmed from the bottom for a little more even look.
Let the panels dry before nailing in to secure. For the trim, I wanted to continue the board and batten style that's on the back side of the island, so I used a piece of primed MDF as my baseboard. You can buy one long plank at HD for about $10. I trimmed what I needed, adhered it to the island, and then nailed it to secure. So here's what the "guts" of the construction looks like, pre-paint and pre-finishing. I have found that seeing pictures like this - of what's underneath the final product - helps me break down a project to a "hey, I can do that!" attainable level. Step 2 in not being intimidated. :)
Once everything was dry and secure, I filled my nail holes and spackled the joints to make them disappear. I really love the version from DAP that goes on purple, and then turns white when it's dry. Once dry, I gave it a good sanding and the joints are just about invisible.
From there, everything got a couple coats of primer and paint, the seams got some caulk and the end result is a custom-finished look that I love! After!:
I added bun feet to the drawer-side of the island to mimic the turned leg of the newel post, and then I also added them to the rest of my cabinets for an even more custom look.

It's just how I hoped it would turn out!
 See?
YOU CAN DO IT! :)
I hope to see you over at On the V Side sometime soon!
Thanks again, Judy, for having me!
Cheers,


looks amazing. what kind of paint did you use on your cabinets?
ReplyDeleteI love the changes to your island. Sometimes the smallest changes make a HUGE impact and your island does that.
ReplyDeleteLove this!
ReplyDeleteLove your kitchen and all the detail to the island just made it. Fantastic. Hugs, Marty
ReplyDelete