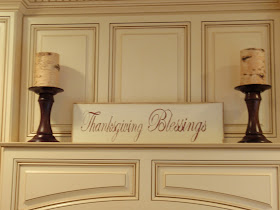
I have been wanting to create a sign for some time now. With Thanksgiving just around the corner, and some scrap wood in the garage, it was time to try my hand at sign-making. Here's how it came out:
Here's how easy it was to do:
I started with a scrap piece of MDF I had left over from another project (which I will be sharing with you in the next few weeks...it's a Christmas project so it hasn't been timely to share yet)
I painted it with one coat of Annie Sloan Chalk Paint in Old White. I only used one coat so that I could still sort of see the wood color below giving it a bit of an aged look.
Then using a rag and dark wax, I outlined the edges.
I used my Silhouette machine to print out my saying in a font that I liked. Then I flipped my saying over and using charcoal...
I shaded in the entire backside of the words.
Then I cut out just the words (so that there would be less charcoal on my project) and traced over each letter using a pencil.
When I removed the paper I was left with the outline of the words.
Then using a brown Sharpie, I filled in what I had traced. I then used a damp paper towel to wipe off the excess charcoal on the sign.
I just love my new sign. It was a quick and simple project...taking less than a half hour.
I'm one step closer in my Thanksgiving decorating.
I'm one step closer in my Thanksgiving decorating.
Don't forget that I still have a stencil giveaway going on. You can click here to enter.
Have a great day!
-Judy


Love it, that looks fantastic and especially in that location. I wish I was brave enough to try something like this, I might now that I've seen yours!
ReplyDeleteJudy, your sign looks fabulous! We have some scrap wood in the garage, from some of the kids' projects. I may have to try this...you make it look so easy!
ReplyDeleteIt turned out great! I did something similar on the wood valance over my sink. (I wanted to remove it, but can't replace the ugly florescent light yet.) I didn't have any chalk, so I used old eye shadow that I was throwing away.
ReplyDeleteBrilliant. I've never tried the charcoal way I've always used pencil. Gonna give your way a go next time though.
ReplyDeleteDid you find the Sharpie was ok going over your paints? I'm having huge problems with getting Sharpie to work properly on paint. Even though they're brand new I'm constantly (every couple of strokes) having to bleed them out on paper as they stop working - Argh!
That turned out great, Judy! I love the font! It's the perfect size for that spot, too. I bought graphite paper to try and do similar. I'm just looking for some clearance or old signs that can be redone.
ReplyDeleteLovely just lovely! And you made it sound so easy! Thanks for sharing!
ReplyDeleteSo sweet. Just think how nice it will be to pull this sign out each year.
ReplyDeleteThat is beautiful Judy! It looks so perfect there in your gorgeous kitchen! :-)
ReplyDeleteVanessa
It's prefect in your kitchen so pretty!
ReplyDeleteXO
Kristin
Your sign is gorgeous! It looks perfect where you put it. Great job :)
ReplyDeleteHi Judy,
ReplyDeleteLove the sign and that it was a simple DIY! Make sure you visit my blog...I'm hosting a $50 West Elm holiday giftcard giveaway that can definitely help with holiday decorating!
http://flowerhilldesigncompany.blogspot.com/2011/11/50-west-elm-holiday-giftcard-giveaway.html
Jean
Wow, your sign is beautiful!! And so prefect for the mantle.
ReplyDeleteJocelyn @
http://justalittlesouthernhospitality.blogspot.com/
Boy, does that look nice there. Elegant and warm.
ReplyDelete=)
That's fantastic & it looks great in your kitchen! I've always wanted to try this.
ReplyDeleteYour sign came out beautiful.
ReplyDeleteDee
Stunning!
ReplyDeleteHi lovely lady.
ReplyDeleteYou have a eye for Beauty and it shows on your post. This Thanksgiving Blessing sign project is fabulous.
You know Iam coming back for more.
I put your Button on my sidebar now I can see your new post.
XXOO Diane
This is beautiful!! The location is perfect too!!
ReplyDeleteI really like this idea. Will be great for some Christmas signs as well.
ReplyDeleteVery nice! I never would have guessed Sharpie!
ReplyDeleteKim
www.todayismysome-day.blogspot.com
What a cute sign - I would love to try this idea very soon. Your kitchen is gorgeous too! Just looking at the pics gave me major "kitchen envy"! LOL
ReplyDeleteVery sweet sign. I love how it looks displayed.
ReplyDeleteMeredith From A Mother Seeking Come find me on my blog, A Mother Seeking...
What a very pretty piece! I love the little details you added! So sweet! Thank you for sharing this @ Show & Share! Happy to have you there!
ReplyDelete