Pages

Thursday, November 28, 2013

Happy Thanksgiving 2013

Happy Thanksgiving!
I wish you and your family a very blessed Thanksgiving.
I am so grateful for you, my readers, and for all of the wonderful opportunities this blog has given to me.  I am very grateful for so many things in my life, and I will spend today giving thanks for all of these blessings.  I hope you all have a wonderful Thanksgiving.

-Judy

Wednesday, November 27, 2013

Fall into Fall - It's a Party #145

Welcome to this week's Fall into Fall party.  Happy Thanksgiving to you and your families as well.  Last week's party was filled with so many great ideas and inspiration.  Here are this week's features:

HOME DECOR:
With a Dash of Color shared her French Country bathroom.  Gorgeous.

CRAFTY CREATIONS:
An Extraordinary Day shared a tutorial on how to make a sweater stocking out of an old sweater.  

FURNITURE TRANSFORMATIONS:

So Much Better With Age  shared how she transformed her dining room table.

TASTY TREATS:
Craft Dictator shared a super yummy recipe for pumpkin dream cupcakes.  

If you were featured, please grab an "I've Been Featured" button (you can now find my buttons by clicking on the buttons tab right under my header).  Now let's get started with this week's party.  I can't wait to see what you have been up to.  Link up anything you have been working on...home decor, sewing, crafts, organizing, baking, recipes etc.   I will keep this link open through Friday.


A few rules:
1.  Please become a follower (if you already follow me on Google, I would love for you to follow me on Linky Followers as well).  

2.  Please grab my party button above and display it either on your sidebar or somewhere in your post.  This way word can spread about the party.  The more people at the party, the more fun we will have.

3.  Please enter the link to your actual post, not just a link to your main blog page.

4. Please visit others who have linked up.   Everyone works hard on their projects and blogs...let's show each other some love by visiting each other.  Let's have some fun and hopefully make a few new friends along the way.

Ok...Let's Party

-Judy


Monday, November 25, 2013

Thanksgiving Kids Table Chocolate Place Card

Thanksgiving is only a few days away.  We have twenty coming for dinner...twelve adults and eight kids.  I've already shared my dining room all set for Thanksgiving here.  I wanted to do something special for the kids table.  I always make place cards for both tables.  But, to take it up a notch I decided to make little chocolate owls to incorporate into my place cards.

First I started with making the chocolate owls using a mold I got from Wholeport.  It's one of the easiest molds to work with and my owls came out perfect each and every time.
First I made the owl chocolates.
Then using my Silhouette machine I printed out owl name cards.  I wanted the names on the owls already so I printed these out rather than having my silhouette machine cut them out.  
I wrapped each owl in a treat bag, punched a hole in the name tag and tied a bow.  
Now my kids table is set as well.  
Doesn't chocolate make everything more fun?

Are you all set for Thanksgiving?


-Judy

Pin It

Thursday, November 21, 2013

How to Make Peanut Butter Filled Chocolate

My all-time favorite candy is peanut butter cups.  Actually any chocolate mixed with any peanut butter I love.  I don't really love chocolate unless it has peanut butter on it.  In fact, anytime there is chocolate in the house, beware, because I will be dipping it into the peanut butter.  With all that said, it's amazing that it took me this long to try my hand at making my own peanut butter filled chocolate.  I always assumed it must be somewhat difficult.  I was so wrong.  It's incredibly easy and even more incredibly delicious.

Here's what you will need:

-Bag(s) of chocolate wafers (you can buy these in any craft store)
- candy mold
-peanut butter


First melt the chocolate in a microwave safe container according to the package direction.  To create these peanut butter filled treats, start by spooning a small amount of chocolate into your mold.  You could use a squeeze bottle to reduce any drips.  Then using a clean paint brush or a tiny spoon (I used an espresso spoon), "paint" the chocolate onto the sides of the mold.  You only want enough chocolate to form a coating around the entire outside of the mold.  Then place in the refrigerator for three minutes.
  
After the three minutes, take the mold out of the refrigerator and add your peanut butter (or any other filling you can come up with).  Then pour additional melted chocolate into the mold until it is full.  Shake the mold gently to get rid of any air bubbles and place in the refrigerator for 15 minutes.  

That's it!  So simple, yet so delicious.  


Be sure to stop back tomorrow to see what my plans are for the chocolate owls.  

-Judy

Pin It

Wednesday, November 20, 2013

Fall into Fall - It's a Party #144

Welcome to this week's Fall into Fall party. 
 Last week's party was filled with so many awesome ideas and inspiration.  
Here are this week's features:

HOME DECOR:
Designs by Pinky revealed her new bar.  Perfect for the upcoming holidays.

FURNITURE TRANSFORMATIONS:
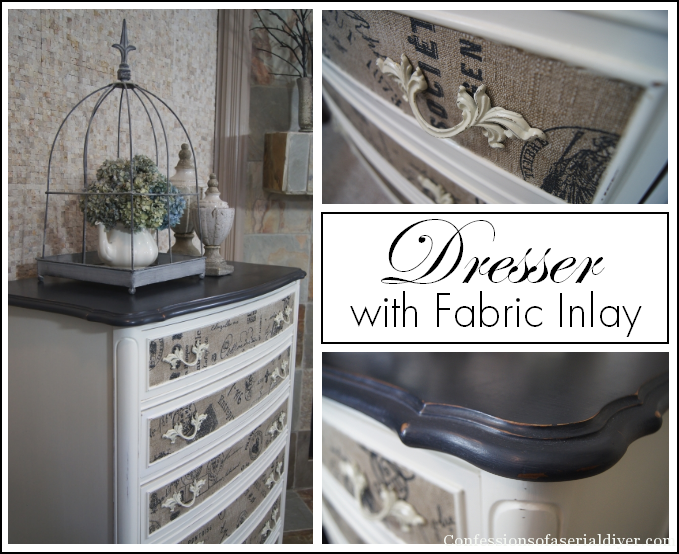
Confessions of a serial diyer transformed a $25 dresser into this spectacular beauty with inlaid fabric.

CRAFTY CREATIONS:
Crochet Dreamz shared a tutorial on how to create this super cute women's slipper boots.

TASTY TREATS:
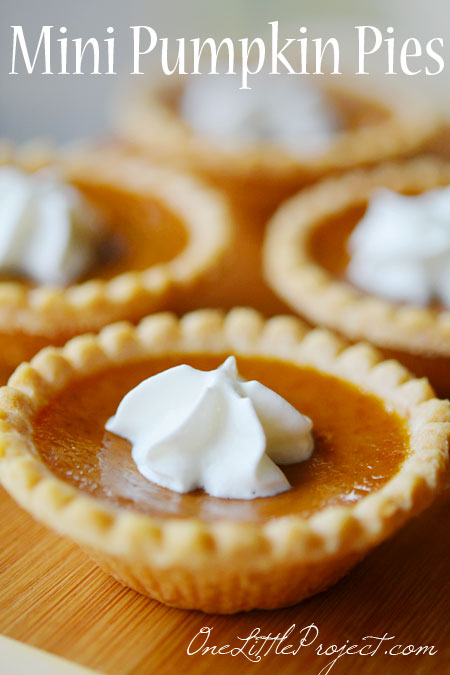
One Little Project  shared a recipe for mini pumpkin pies.  What a great idea!

If you were featured, please grab an "I've Been Featured" button (you can now find my buttons by clicking on the buttons tab right under my header).  Now let's get started with this week's party.  I can't wait to see what you have been up to.  Link up anything you have been working on...home decor, sewing, crafts, organizing, baking, recipes etc.   I will keep this link open through Friday.


A few rules:
1.  Please become a follower (if you already follow me on Google, I would love for you to follow me on Linky Followers as well).  

2.  Please grab my party button above and display it either on your sidebar or somewhere in your post.  This way word can spread about the party.  The more people at the party, the more fun we will have.

3.  Please enter the link to your actual post, not just a link to your main blog page.

4. Please visit others who have linked up.   Everyone works hard on their projects and blogs...let's show each other some love by visiting each other.  Let's have some fun and hopefully make a few new friends along the way.

Ok...Let's Party

-Judy


Related Posts Plugin for WordPress, Blogger...