Pages

Saturday, December 31, 2011

Happy New Year!!

Happy New Year!!


We like to be low key for New Year's Eve.  We spend it each year with our best friend's and their two kids (who are the exact same ages as my kids). 
On the menu for tonight is individual beef wellington and for dessert creme brulee (made with the new kitchen torch my son bought my husband for Christmas).
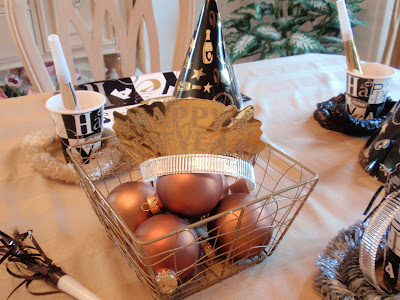
Although our dinner is on the fancy side, I just couldn't bear to do dishes all night...again (remember we had 30 people for Christmas Eve).  So I opted for some fun paper New Year's Eve decor.
I hope you all have a wonderful, healthy and safe New Year's Eve!!
-Judy
PS - On a separate note- I am having issues with Blogger and when I upload photos instead of going into an existing album on Picassa Web it is creating a new album for each photo and it is not even getting the orange blogger symbol for a new album.  I've been trying to figure it out all day...and I can't.  Anybody have any ideas?  I've checked all the settings and can't see anything wrong.  It's supposed to do it automatically and there is still a ton of space in the latest album.  Thanks.

Friday, December 30, 2011

Budget-Friendly Kitchen Makeover Ideas

Home Sweet Solutions: Upgrade It

Budget-friendly Kitchen Makeover Ideas


By LuAnn Brandsen for Home Sweet Solutions


Usher in this holiday season with simple kitchen updates that’ll make gatherings more memorable than ever. While a major kitchen remodel may exceed your budget, you can enjoy a number of inexpensive updates now by cashing in on design creativity, smart materials and economical decorative touches to dress up your kitchen with comfort, warmth and personal style.

1. Add a touch of glass: A new backsplash can make a big design impact without you needing to spend big bucks. Heat-resistant glass is on trend for a backsplash, and its glossy good looks are especially fresh in subdued violets and seafoam greens. Equally sleek are mosaic glass tiles or the installation of plate glass over wallpaper or painted drywall.

2. Layer in lighting: Cost-efficient lighting can dramatically brighten your kitchen’s functionality and mood. A monorail track system provides good overall lighting. Improve task lighting by adding inexpensive plug-in light strips under cabinets and pendants or chandeliers above the island or sink. Use accent lighting to highlight artwork and architectural details, and don’t forget the small-but-always-effective dimmer switch to set the mood -- and save on your electric bill.

3. Replace hardware: Update drawer pulls and cabinet handles to give your kitchen a new look for minimal cost. If you fall in love with pricey knobs, use just a few as accent pieces on upper cabinets.

4. Leave a message: Create a handy message center by painting a cabinet door, pantry door, accent wall or the top half of a basement door with chalkboard or magnetic paint.

5. Dress the windows: Fashion simple valances or cafe curtains from lightweight fabrics in cheery colors and stylized patterns. For one-of-a-kind curtains, hang vintage aprons or stitched tea towels in a patchwork design.

6. Clear the clutter: Make your kitchen feel more inviting by using stackable and hanging storage, drawer inserts and baskets to keep clutter under wraps.

7. Make it cozy: Take a cue from your living room to add comfort and style: Repurpose furniture, hang drapes, incorporate artwork and make room for freestanding furniture, such as an armoire to hold cookbooks, a desk for an added workstation or a comfy upholstered chair.

8. Use counter intelligence: A new counter provides instant gratification for your budget kitchen makeover. Laminate offers the look of granite, stone and marble for a fraction of the cost. But even granite can be affordable if you use remnants or thin-cut slabs with a simple edge treatment. Or save by limiting higher-priced countertop materials to just the island.

9. Add pretty storage: Replace a boring standard cabinet or fill an empty wall with open shelving that can display dishes, vases and even small picture frames or figurines. Or remove cabinetry doors and equip shelves with attractive storage baskets.

10. Incorporate inexpensive focal points: Try for at least one unique design feature in your kitchen. A plate rack, glass cabinet doors, single wallpapered or different-color wall, colorful backsplash or a stylish shelf can provide an attractive accent that won’t cost a fortune.

11. Update cabinets: There are dozens of ways to update drab cabinets, including paint for wood, veneer and metal styles. White and cream paint always looks fresh, while rich browns, grays and black offer a sleek, sophisticated vibe. For an old-world feel, consider a crackled or slightly worn faux finish. If you have recessed-panel doors, remove the center panel and insert reeded, textured, etched or stained glass to a few doors or to all.

12. Create island magic: You don’t need a massive workstation to enjoy having a kitchen island. Repurpose an old dresser, table, butcher block or cart for a freestanding piece.

13. Furnish style on tap: Make a splash with a new focal-point faucet. Today’s broad selection of kitchen faucets ranges from minimalist restaurant-style designs to farmhouse rustic to classically cool, with finishes ranging from shiny chrome, brass or copper to matte, brushed nickel or burnished copper.

14. Add architectural accents: Add corbels beneath island countertops, shelves and cabinetry. Enhance an island with carved wood legs and corner posts. Crown a bank of cabinetry with molding for a custom design. Add crown molding to the ceiling.

15. Paint your decor: Wall color is one of the least expensive ways to update a kitchen. Choose an easy-to-clean semigloss finish. Bold greens and light violets are popular modern colors. For a more classic feel, brush on neutrals such as the increasingly popular cool browns and complex grays.

LuAnn Brandsen is the former editor of Renovation Style, Country Home, Country Gardens, BHG Beautiful Kitchens and BHG Beautiful Baths magazines. She currently writes about homes, gardens and food while her brand-new energy-efficient dishwasher does all her dirty dishes.LuAnn's articles have previously appeared in Home Sweet Solutions.


Thursday, December 29, 2011

The Year in Review

2011 was my first full year of blogging.  The year was filled with lots of DIY projects, crafts and ideas. 
 Here's a recap month by month.
January
I started the year off with a makeover to my daughter's room taking it
 from toddler to tween...or so I thought.  

Who would have thought that the room update wouldn't even last until the end of the year?

February
These almost no-sew pillows that I created out of placemats I found at Home Goods 
were one of my most popular posts.  These pillows took no time to make.
March
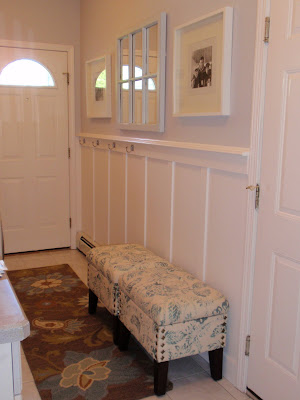
In March I took on my first board and batten project and revealed a whole new mud room.
It's so amazing the difference just the board and batten made...even before all the finishing touches.
Also in March I created this beautiful ottoman out of an old Christmas stand. 

April

In April I created a pillow and a tote bag using four dinner napkins I found at Home Goods.
May
In May I took a Craigslist find and turned it into something special using chalk paint and drop cloths to reupholster it.  Now it's an awesome chair in my guest bedroom.
June
In June I updated our downstairs bathroom with paint and accessories.
There were some projects in that bathroom as well...

and...

July
I picked up my first trash from the side of the road and created a treasure out of it.  My kids were mortified, but were impressed once they saw how I made over these chairs.  
 August
It finished off our outdoor patio perfectly.
September
In September I made lined pinch pleat drapes for my guest bedroom.  They were a little time consuming, but very easy.  The tutorial is here.
October
Who could forget October when I climbed up above my front door and decorated
 Is there anything I won't do in the name of decorating??
November
In November I updated my daughter's room.  She was finally ready for a full size bed and wanted the colors more tween-like.  I knew her original makeover was a temporary fix, I just didn't realize how temporary...what I didn't count on was the changes that happen when you start Middle School.

December
In December I created this Pottery Barn Teen inspired style tile board for a fraction of the cost.
  A few days later I made these fabric covered letters to go above the memo board.

I want to take a moment to thank all of you.  Whether you stop by everyday or just once in a while, I appreciate all of your visits.  I look forward to a wonderful 2012!!
Happy New Year!
-Judy

Wednesday, December 28, 2011

Winter Blues Wednesday - It's a Party #45

Welcome to this week's party.  It's officially winter now, so we go from my Fall into Fall party to my Winter Blues Wednesday party.  Last week's party was filled with awesome projects and inspiration.  Here are this week's features:

I loved these drapes when I saw them.  When I found out that From Gardners to Bergers stenciled a damask pattern on plain drapes from Ikea, I was super impressed.  These drapes are gorgeous.
Do you have any more gift cards to give out?  If you do, you should head on over to Flower Hill  to check out her tutorial on how to make this adorable DIY paper purse for gift cards/money.  So cute.
Look at this gorgeous ruffled star tree skirt created by Strawberries and Sweet Love.  If you want to get a head start on next year please head on over for the tutorial.  So elegant. 
  I love this crocheted ornament created by Frou-frugal.   
I will definitely be making some of these for next year.
Artist Barbara Rosenzweig painted this picture called Girl into the Surf.  Doesn't this make you want to be at the beach?  You can head on over to her blog to check out more of her work.  

If you were featured, please grab an "I've Been Featured" button (you can now find my buttons by clicking on the buttons tab right under my header).  Now let's get started with this week's party.  I can't wait to see what you have been up to.  Link up anything you have been working on...home decor, sewing, crafts, organizing, baking, recipes etc.     I will keep this link open through Friday.


A few rules:
1.  Please become a follower.  

2.  Please grab my party button above and display it either on your sidebar or somewhere in your post.  This way word can spread about the party.  The more people at the party, the more fun we will have.

3.  Please enter the link to your actual post, not just a link to your main blog page.

4. Please visit others who have linked up.   Everyone works hard on their projects and blogs...let's show each other some love by visiting each other.  Let's have some fun and hopefully make a few new friends along the way.

Ok...Let's Party

--Judy

Tuesday, December 27, 2011

Look What I Got From Santa

Well, technically it is from my husband...but look what I got...
It's an embroidery sewing machine!  Can you even imagine the possibilities of what I will be making in 2012 with this baby?  I am having so much fun just playing around with it right now.  
I can't wait to show you my first real project with it.
It's so awesome!!  While I write this post it is downstairs finishing sewing the monogram design.  
How cool is that??
Don't forget to stop back tonight at 8pm EST for my Winter Blues Wednesday party.  
Hope to see you all then.

-Judy

Monday, December 26, 2011

Winner of Alexander Creative Giveaway Announced

I hope you all had a wonderful Christmas.  We thoroughly enjoyed every moment of it.  I look forward to sharing some of the awesome gifts and stories soon.  Today will be spent attempting to get the house back into order, finding homes for the new toys and spending some quality time with our kids. 

The winner of the Alexander Creative Giveaway, according to Random.org is
#24 Natalie Jane!

Congratulations. I will be sending you an e-mail.   
-Judy
  

Friday, December 23, 2011

Feast of the Seven Fishes and Simple Name Cards

We host Christmas Eve each year and we do so with a traditional Italian feast of the seven fishes meal.  Today will be spent prepping as much as we can so that we are ready for tomorrow night.
We have thirty people coming for Christmas Eve dinner, so we have started to set the extra tables necessary in order for everyone to have a seat.  
We always frame our menu to let people know what's coming up next.  It helps everyone pace themselves as well.  Lol

Using a bread basket, a candle and some ornaments, I created this simple centerpiece this morning for the kitchen table.  (Just so you know, I ironed that tablecloth twice...I can't get those creases out).

I also made these simple name cards using scrapbook paper (card stock weight).
I cut each name card to size, scored it in the middle and then using a scrap piece of paper used it as a guide so that my glue went on in a straight line.
I then flipped it over and dipped it into the glitter.
Voila!  Then I used a silver Sharpie and wrote each adult's name on a card.
I am one step closer to being ready.

Also, the Alexander Creative giveaway is still going on.  There's still time to join here.

I wish you all a very Merry Christmas filled with peace, love and joy!

-Judy

Thursday, December 22, 2011

A Few Additions to my Holiday Decor

Although most of my holiday decorating is done, there are a few more things I have added.  My dining room was ready, but I wanted to add a wreath to the window.

I started with an old wreath I had in the house.  This wreath didn't even make the cut this year and was still in the Christmas boxes in the basement closet.
 I starting it's transformation by removing all of the old ribbon.
Next I created a bow out of new ribbon I got on sale as Michaels.  You can click here for my tutorial on how to make these easy bows.  At the moment I can't seem to find my floral wire, but I refuse to buy more because I know I have two spools of it somewhere, so instead I just used twist ties (that you would use on a sandwich bag) to make my bows.  It works just as well.

I took different ribbon, which I also got for 50% off at Michaels a week or so ago, and weaved it around the wreath.  Then I added bronze ornaments all around.
I hung it in the dining room window.  I had a hard time getting a decent photo of the wreath.
I tied it to my curtain rod using ribbon.
My dining room is basically ready.  My table is all set for Christmas Eve.
While I was in Home Goods last week, I came across these napkin rings.

Although these napkin rings are not Christmas per se...I just LOVE dragon flies in home decor, so they came home with me.  Tomorrow we will be setting up the kitchen and beginning preparation for Christmas Eve dinner.  We will be adding extra dining tables to the kitchen in order to accommodate the 30 people we have coming for Christmas Eve.  I will share the menu with you tomorrow.

Are you ready for the holidays?

-Judy
Related Posts Plugin for WordPress, Blogger...