Pages

Showing posts with label artwork. Show all posts

Tuesday, March 11, 2014

Trying Out Artwork in the Living Room

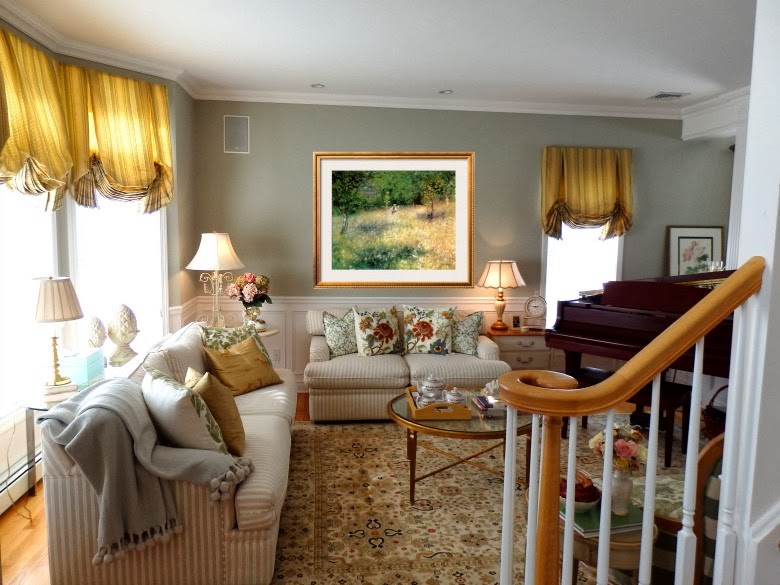
Now that I have found a rug for my living room, it's time for me to turn my attention to the artwork.  We have a beautiful piece of art that used to be over the sofa in the living room, but the colors really don't work in the room anymore.  To start the process, rather than running around store to store, I decided to go to an online art store and try out some artwork in the living room...virtually.
 I "framed" the artwork online and then placed it virtually in the room using PicMonkey.


It's a good way to get a sense of what colors work best in the room.


I haven't found anything perfect yet, but I'll keep on looking.

Don't forget to stop back tonight for my Winter Blues Wednesday party that opens at 8pm EST. 
 Hope to see you there.


-Judy

Pin It
Sharing with Savvy Southern Style
Sharing with The Scoop
Sharing with A Stroll Thru Life

Monday, October 21, 2013

Hanging Artwork - Easy Tips and Tricks

Buying the perfect piece of artwork can be challenging.  There is so much to consider...the colors, the feel, the style.  Once you find the perfect piece, now you need to hang it.  There is plenty to consider when hanging artwork.  How high should it be hung on the wall?  What type of brackets should it be hung with?  Should it be hung alone or in a grouping?  
There are lots of options out there, even picture hanging wire, to hang artwork.  I usually hang artwork using picture hanging hooks.  They are much better than heavy duty nails or screws because the picture hooks go into the wall on an angle, securing them to the wall without much risk of being pulled out.  

Image
It's important to select the right picture hook for your artwork.  It's all based on weight.  They usually come in three sizes...one for pictures less than 30 lbs, one for pictures up to 50 lbs and one for pictures 50-75lbs.  No matter what the weight of your artwork, make sure you use two picture hooks.  This adds extra security as well as helps make your pictures hang straight.  As an added tip I use fun tac in the back of my artwork so that it doesn't move at all when dusting the frames from time to time.


One of the biggest mistakes people make when hanging artwork is to hang it way too high.  A good rule of thumb is to hang the artwork so that the center is  66" off the ground, 
which places it at eye level.   It's also very helpful if someone holds up the picture so that you can step back and see how it looks before you fill your walls with holes.  

When hanging a pair of works, treat them as one large piece and center them using the same rule of thumb.  If over a bed or sofa, keep in mind the scale of furniture in deciding placement.

When hanging a collage of photos or artwork, you can start in the center and work your way out.
However, there is no hard and fast rule...in fact the best part is there are no rules.
Artwork doesn't always have to be art.
You can even hang a grouping of plates to create your own inexpensive artwork.

You can do just about anything your imagination can come up with.
The worst that can happen is you have to get out a little spackle and touch up
any holes you make if you have to move anything.

Hope these tips are helpful next time you go to hang artwork.


-Judy
Pin It

Monday, March 25, 2013

Artwork on a Budget

Happy Monday!  My kids are on spring break this week so I may not be around blogland as much as usual.  This weekend I continued to put the finishing touches on our newly renovated basement.   
Directly across from this Ikea piece is a long wall that I needed some wall art to cover.  This is our downstairs family room and I wanted the artwork that covered this long wall to have some meaning.  I also wanted the artwork to be large and cohesive.  
How about framing puzzles?  We have been putting together puzzles from the same collection over the school breaks for the past few years.  We have put together three so far and have one more to go.
I went to Ikea and bought four of the RIBBA frames with mat.  The puzzles are all from the same collection so they "go together" well.  To give them even more presence, I chose frames that have a mat.  It gives it an art gallery appearance.
Using duct tape, I taped the puzzle to the back of the mat.  (Note, after this photo I decided to tape all around the puzzle rather than four small pieces to make sure nothing moves).
Then I did some math.  I added together the width of all four frames and subtracted it from the length of the wall.  Then I decided how many inches I wanted between the photos and evenly divided the remaining space on either end.  Then I did the math to figure out exactly where each of the picture hooks would go.  I made sure when I wired the back of each frame, I had the exact amount of space from the wire to the top of the frame.  

All of this math made hanging the artwork all at the same height much easier.
 You'll notice the last frame on the floor.  I already put the picture hooks in the wall, so it is ready whenever the last puzzle is ready.
Here is the puzzle for the last frame.
Hopefully we can finish it by the end of the break!

Once it's done, I will reveal the entire wall with all with the furniture back in place.


Hope you have a great day.
What do you think of my fun, puzzle art?
Anyone else enjoy doing puzzles?

-Judy

Pin It

Tuesday, May 15, 2012

Tips and Tricks to Hanging Artwork

Buying the perfect piece of artwork can be challenging.  Once you find the perfect piece, now you need to hang it.  There is plenty to consider when hanging artwork.  How high should it be hung on the wall?  What type of brackets should it be hung with?  Should it be hung alone or in a grouping?  
There are lots of options out there, even picture hanging wire, to hang artwork.  I usually hang artwork using picture hanging hooks.  They are much better than heavy duty nails or screws because the picture hooks go into the wall on an angle, securing them to the wall without much risk of being pulled out.  

Image
It's important to select the right picture hook for your artwork.  It's all based on weight.  They usually come in three sizes...one for pictures less than 30 lbs, one for pictures up to 50 lbs and one for pictures 50-75lbs.  No matter what the weight of your artwork, make sure you use two picture hooks.  This adds extra security as well as helps make your pictures hang straight.  As an added tip I use fun tac in the back of my artwork so that it doesn't move at all when dusting the frames from time to time.


One of the biggest mistakes people make when hanging artwork is to hang it way too high.  A good rule of thumb is to hang the artwork so that the center is  66" off the ground, 
which places it at eye level.   It's also very helpful if someone holds up the picture so that you can step back and see how it looks before you fill your walls with holes.  

When hanging a pair of works, treat them as one large piece and center them using the same rule of thumb.  If over a bed or sofa, keep in mind the scale of furniture in deciding placement.
Image
When hanging a collage of photos or artwork, you can start in the center and work your way out.
However, there is no hard and fast rule...in fact the best part is there are no rules.
You can do just about anything your imagination can come up with.
Source
The worst that can happen is you have to get out a little spackle and touch up
any holes you make if you have to move anything.

Hope these tips are helpful next time you go to hang artwork.

Don't forget to stop back tonight for my Swing into Spring party.


The party opens at 8pm EST.  Hope to see you then.

-Judy
Pin It

Monday, November 28, 2011

Peace, Love and Tennis

Hope you all had a wonderful holiday weekend.  
I am still busy trying to put the finishing touches on my daughter's new tween room.  
Yesterday I became inspired and created the second piece of art for her room.
I knew I wanted to do something with a peace sign to pick up on the bedding in her room, and at the last minute I decided to add the words...which are completely perfect for her since she spends over twenty hours a week playing tennis.
Here's how I created it:
I started with a blank canvas that I painted Restoration Hardware Baby and Child Petal Pink to coordinate with the focal wall in her room.  I then used a flower paper punch to cut out flowers out of scrapbook paper.

I traced around a salad bowl onto white paper (I taped two pieces together) 
to form a template for my peace sign.   

I used the template to lay my flowers around to form a perfect circle.  Something just wasn't right.  Her new walls are more of a teal and this blue wasn't really cutting it.  I didn't have any turquoise craft paper. What to do, what to do?  Then I saw it in the garbage.  The Tiffany's catalog.  PERFECT!  

I used both the envelope and the turquoise pages to cut out my flowers in the right colors.  
I had just enough pages to complete my project.  
I only wanted to cut out the flowers where I could get only teal (no jewelry on the flower...lol).  
The outside circle was from the interior of the Tiffany's catalog and the peace sign part was from the envelope (they are slightly different shades of teal).  I adhered it to the canvas using one of those double sided tape sticks (looks like the white out sticks).  It was much neater than mod podge.  Unfortunately I ran out of the tape before the end of the project and had to finish it using one of my kid's glue sticks.
It still needed something else...that's when I decided to add a second layer of flowers above the Tiffany flowers.  I love the depth and dimension it added.
Using my Silhouette machine and literally scraps of white vinyl I had left over, I added the words.
I love how it coordinates with the subway art I created last week.
This side of the room is done (BTW that's an optical illusion...the two pieces of artwork are hung completely evenly - I even went to remeasure after seeing this photo).

Can't wait to hear what you think.  
Hope to see you tomorrow...I have a great giveaway planned.

-Judy

Tuesday, October 12, 2010

Boys Room Decorating

Boys rooms are fun to decorate.  But as we all know, kids grow up...really fast.  When decorating any child's room, I think it is important to realize that no matter how much you may think the room won't need updating...the room will need updating.  What was appropriate for your child at three, won't be the same when they are seven and ten.  When we moved into our home, my son was only 2 1/2 years old.  He is 13 now, so his room has gone through several transformations.  He was still in a crib when we moved in.  He was very into Winnie the Pooh at the time.  My brother painted a mural over his crib of a Winnie the Pooh scene.  When he was 7, Winnie the Pooh was no longer his thing, but I couldn't paint over the mural just yet.  He was now into baseball and a Yankee fan.  I updated the mural by painting on a NY banner on the tree and gave Tigger and Christopher Robin Yankee hats.  We bought him a twin bed from Ikea which I painted navy blue.  We took two baseballs and drilled a hole in the bottom of each.  We then drilled a hole on each of the posts of the bed and screwed a screw in halfway.  We then cut off the head of the screw and screwed it into the baseball.

I also bought an unfinished nightstand from AC Moore and painted it the same navy blue as the bed.  I added baseball knobs on it and that was his nightstand.  I swapped out the Pooh border for a sports border from Bombay Kids.


When he was ten, it was time to say goodbye to Pooh all together.  It wasn't easy getting rid of the mural...and I don't just mean emotionally.  It took 4 or 5 coats of primer to not see it bleeding through.  I made the mistake of using a Sharpie pen to outline all of the characters.  That was the toughest to cover.

In order to get rid of the "little kid" feel to the room, the powder blue needed to go.  I took the left over paint from the bed that we had painted a few years before and I wiped it over the powder blue.  I used an old t-shirt ripped up as well as a wet sea sponge.  I wanted it to look more like denim.  The picture above his bed is a Thomas Kincade of Yankee Stadium.  That was his birthday present this year when he turned 13.

The window treatment was made during the first transformation.  With a sports theme, I wanted something that looked like pennants.  I used a brown paper bag and cut out triangles in the size and shape of a pennant.  I did some math to figure out how many I wanted across with a little overlap.  I used a solid navy and a stripe.  I cut out two triangles for every point.  With right sides together I sewed the "V" shape leaving the top open so that I could turn it to the right side.  I then measured the length of the continental rod which was already hanging (a pooh valance was hanging prior).  I cut enough of the solid navy to make a sleeve to fit the rod.  I sewed the triangles to one side of the sleeve before attaching the two sides.  I then slid it on.  Simple... and it is not too age specific so it made it to the latest version of his room.


Finally...artwork.  In my opinion, every child's room should be a reflection of who they are...albeit that who they are will change with time.  Artwork should reflect their current interests and make their room unique to them.  My husband is taking my son to every major league baseball stadium (there are 30 in total) by the time he leaves for college.  They started several years ago, and currently he has visited 18 stadiums (the extra ball is from the Inaugural season of the new Yankee Stadium...just a place holder for the next ball).  They collect a ball from each stadium and display them in this case in his room.  This is something completely unique to my son and is a physical reminder of memories being made.  You could do something similar with whatever your child's interests are.  I can't tell you how happy it makes my son to look at that case and plan his next stadium visit.

I'd love to see some of your boy's rooms.  Please send them to me and I will post them.

-Judy
Related Posts Plugin for WordPress, Blogger...