Pages

Monday, March 26, 2012

Three Year Old Boy's Room Revealed

A few months ago my brother and his wife bought their first home together.  They have twins that just turned three.  As a house warming gift I decorated each of their kids rooms.  You can check out my niece's room here that I revealed a few months ago.  This past weekend we finally got back to my brother's home to add the finishing touches to my nephew's room.  
Here is the long awaited reveal:
To really appreciate the after, you have to see the before...
The people that my brother and his wife bought the house from had a son who literally had hundreds of photos and magazines nailed to the wall.  It took us hours and hours to just prep the room for paint.
There were also some huge holes in the wall that needed patching as well.
It was basically a mess.  Once it was all prepped we gave the room a new coat of
 paint in a blue/grey color.  The basic color scheme for the room is blue with red accents.
The bed is from Pottery Barn and the bedding from Home Goods.
My nephew loves anything that involves a ball so a loose sports theme was a must.
I wanted something for over the bed.  I bought these red frames from Ikea and decided to simply print out letters on regular printer paper to spell out my nephew's name.  These are super light weight frames with plastic "glass" hung on picture hooks and then secured on the bottom
with fun tac to keep them in place.
On the large wall next to the bed I added these CARS decals from Target.
Great impact, and wall filler, for $10.
The bookcase was an old bookcase my brother found on the streets of Manhattan before they moved.  
I simply painted it a navy blue and added sports decals.  The memo board was found in one of the closets, but the color went perfectly with the room, so we used it.
The red shelves are also from Ikea.  I love all the pops of red.
Do you remember this dresser?  This is the Ikea Malm dresser I hacked a few months ago
 just for this room.  You can check out the before and after here.
The mirror was an old, beat up mirror my brother had, that I transformed with fabric and twine.
Stop back tomorrow and I'll show you the before and after of this 
mirror and one I did for my niece's room as well.
The lamp is from Home Goods as well.
Here's one more look at the before and after.
It's a major transformation.
The best part is that my nephew loves it!

Here are the sources:
Bedding - Home Goods
Bed - Pottery Barn Kids
Drapes - Target
Red Shelves - Ikea
Red Frames - Ikea
Lamp - Home Goods
Dresser - Ikea Malm hacked
Bookcase - trash to treasure...literally

I can't wait to hear what you think.
-Judy
Pin It

Friday, March 23, 2012

Spring is Really Here

It was 80 degrees here in New York yesterday.  
I looked outside my kitchen window and this is what I saw...
Nature is incredibly beautiful!
This may actually be my favorite time of the year.
I hope Spring has hit where you live.
Enjoy your weekend!!
-Judy

Thursday, March 22, 2012

Crafty Spring Vignette

With the warm weather and Easter just a few weeks away, I decided to create another spring vignette.  
I bought this cute oval shaped embroidery hoop from JoAnn's.
Using buttons I have collected over the years (you know how when you buy clothing they often give you an extra button...well this is the box I keep them all in), I embroidered a spring design.
I just free-handed it, but you could use a pencil and draw out your design first.
I started by adding a remnant of fabric I had leftover to use as a runner for my table.
I leaned the embroidery hoop on a vase with a flower topiary 
I created my topiary using a flower punch, scrapbook and straight pins.
I tied it off with a bow and added a little bird on top.
My sweet little bunny...well I made him about 17 years ago in a ceramics class I took with a few friends.
He was one of my first projects in that class.  Isn't he so cute!!
On the other side, I added a shallow crystal bowl filled with burlap 
and a few more crocheted roses I made.
What do you think of my "crafty" spring vignette?
Can't wait to hear what you think.

-Judy

Pin It

Wednesday, March 21, 2012

Swing into Spring - It's a Party - #57

It's officially Spring!!!  I must say that it was the mildest winter we have experienced that I can remember.  Last week's party was filled with so many awesome ideas and inspiration.  
Here are this week's features:
I am in love with this dresser created by 4 The Love of Wood.
I have already pinned this and it is on my list of things I want to make.  
I am on the hunt on Craigslist for a dresser to do this to.  Isn't it just gorgeous???

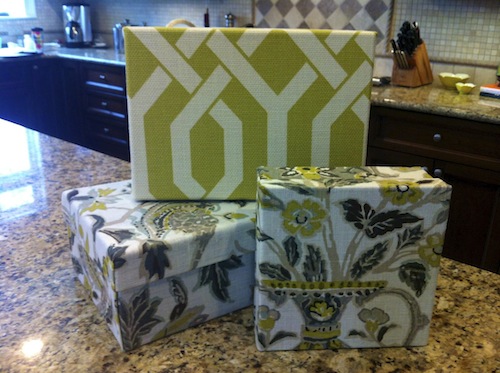
I love the fabric used on these boxes created by Lori May Interiors
She has a great tutorial to make these as well.  
Design Dreams by Anne made her own chalk paint to transform an oak armoire. 
 If you're interested in making your own chalk paint, please stop by her blog for the recipe.
Lakeshore Cottage shared her girls' room makeover.  Everything is handmade.  Just gorgeous.  
Please stop by for the full reveal.
I just love these topiaries that The Stonybrook House created.  Perfect for the first edition of my Spring party.  Please stop by her blog for the full tutorial.

If you were featured, please grab an "I've Been Featured" button (you can now find my buttons by clicking on the buttons tab right under my header).  Now let's get started with this week's party.  I can't wait to see what you have been up to.  Link up anything you have been working on...home decor, sewing, crafts, organizing, baking, recipes etc.   I will keep this link open through Friday.


A few rules:
1.  Please become a follower (if you already follow me on Google, I would love for you to follow me on Linky Followers as well).  

2.  Please grab my party button above and display it either on your sidebar or somewhere in your post.  This way word can spread about the party.  The more people at the party, the more fun we will have.

3.  Please enter the link to your actual post, not just a link to your main blog page.

4. Please visit others who have linked up.   Everyone works hard on their projects and blogs...let's show each other some love by visiting each other.  Let's have some fun and hopefully make a few new friends along the way.

Ok...Let's Party

-Judy

Tuesday, March 20, 2012

No Sew Table Runner

I have wanted a new table runner for my kitchen table.  I wanted that burlap look, but also wanted a little pattern as well.  I had this fabric left over from my down-stairs bathroom makeover.  
This project is truly a no-sew project.  
All I did was take this fabric and fray the edges by pulling one fiber out at a time.

I did this on all four sides...

The result...a fringed edge.

This was the easiest project I've done in a while, but I just love the result.

Don't forget to stop back tonight for my Swing into Spring party.


The party opens at 8pm EST.  Hope to see you then.

-Judy

Pin It

Monday, March 19, 2012

Paper Bow Tutorial

When wrapping a gift, it's always nice to add a pretty bow.  Here's a simple tutorial for you to create one out of things you already have in the house, in just minutes.
I made this bow using scrapbook paper.
  I used thin scrapbook paper, rather than cardstock,
as it is much easier to work with for this project.
I made this bow out of a magazine page.
Here's how you do it...
You will need to cut your paper into 9 strips all 3/4" wide.  The first three are the full length of the page (in this case 12").  The next three strips are 1" shorter (11"), the next two strips are 2" shorter (10") and the last strip is 3 1/2" long.
Next I twisted each strip as shown (it sort of looks like a figure eight).
The 3 1/2" strip I rolled and glued it into a circle.
I stapled each one to create the figure eight.  
You could staple it or tape it or glue it.  It was just faster for me to staple it.
Then I took the first three full length figure eights and laid them one on top of the other alternating direction.  I glued each one together using a glue stick.
 Then I continued in size order gluing each one on one and a time.
  I ended with the circle glued to the center of the bow.
It's really that simple.  You will never buy a store bought bow again.
I hope you will try this project.
Have a great day.
-Judy
Pin It

Related Posts Plugin for WordPress, Blogger...