Pages

Showing posts with label master bathroom. Show all posts

Monday, April 13, 2015

Master Bathroom Updates Continue - DIY Faux Granite

I'm on a mission to update our master bathroom spending as little as possible with maximum bang for my buck.  Last week I added feet and handles to the vanity in our master bathroom.  You can check that out here.
This week I've partnered with DesignYourWalls.com to transform my vanity top to get the granite look I've been longing for.

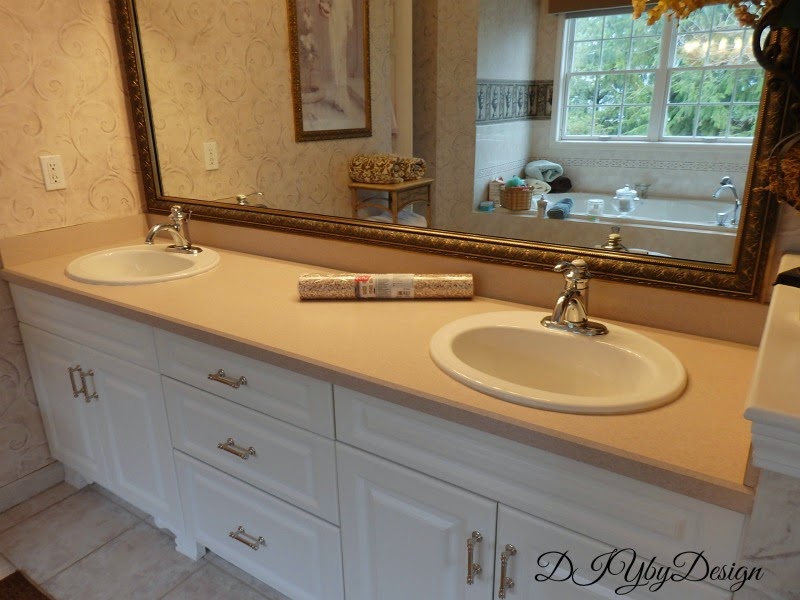
Here is the vanity before with a laminate top.
This project took me less than an hour and completely transformed the look of my vanity.  I chose the beige granite from the DesignYourWalls website.  
I started by completely clearing the vanity top and making sure the surface was clean and dry.  The paper was not as deep as my countertop so I was strategic in how I laid out the paper.  The paper measures 18" x 49.5 feet so I had plenty of length so I didn't worry about making any cuts. It's self adhesive and repositionable so it's forgiving and allows you to move it about until you get it into the perfect position.

I didn't want any seams near the front so I adhered and wrapped the paper around the front of the countertop.  This product is similar to contact paper, but much thicker and more substantial.  It also doesn't stick to itself like most contact paper does so it's very easy to work with.

The key to success is making sure there aren't any bubbles.  Because the paper is a bit thicker it is very easy to avoid any bubbles.  I used an exacto knife to cut around the sink. I then took another piece of paper and matched up the seam and wrapped the back half of the vanity in the same way.
Voila!  Instant granite.  I was super careful making sure the back seams lined up exactly and it's nearly impossible to find now that it's all down.  I butted the two edges up together, not overlapping because that would have shown.  Even running my hand along it, it is very hard to find the seams.  I am super impressed with this product.

Here is a closeup.  It really does look like granite.  It even has the sheen of granite.  It's completely waterproof so it should be very practical as well. In the event my tastes change it's also removable which is great.  I was afraid to try one of those faux granite paints...too permanent for me.  
What a huge difference this faux granite makes to the bathroom.  
DesignYourWalls has tons of options including a split stone paper...
and a marble paper (I definitely want to try this one next).

They have lots of other products too including wallpaper, wall decals, and window film to just name a few.  

It's really a great product and DesignYourWalls is a great website.  Hope you will check it out.

Can't wait to hear what you think of my new granite vanity top.
-Judy

DesignYourWalls sent me a roll of granite paper, however the opinions expressed are all my own.


Friday, April 10, 2015

Bathroom Vanity Makeover for Under $50

I have been wanting to renovate the master bathroom for a while now, but after pricing it out and getting quotes in the $35,000 range, I have decided to table it for now.  One of the things that was a must have in my bathroom reno plans was a vanity that looked like a piece of furniture.  I love the look of legs on a piece of furniture.  I went into my local hardware store to see if I could find something that would fit the bill. 

Sure enough I came across these.  They were perfect.  They were the exact height I needed under the vanity in my master bathroom.
Here is the only before photo I have of the vanity.  It was a plain builders grade vanity.
I painted the feet a semi gloss white I already had in the house and literally wedged it under the vanity.  It fit perfectly.  Not too tight and not too loose.  


I also changed out the hardware on the cabinet doors.
Here is a closeup.


Can't wait to hear what you think.

-Judy

Friday, May 11, 2012

The Tale of a Clock - It's a Mystery

Several years ago, well before blogging, I was wandering through Michaels craft store and stumbled upon this "French" clock on clearance.  I absolutely loved everything about it.  It was the perfect color and style for my master bathroom and looked just beautiful between our two sinks.
 It was also very useful.  My husband and I both relied on it each morning as we got ready.  
Then one day, more than a year ago, the clock stopped working.  I replaced the battery and it still didn't work.  I bought new batteries and it still didn't work.   I tried to take the clock apart but there was no way without breaking it.  I thought about having it repaired, but it would cost significantly more than what I spent on the clock in the first place.  I loved the way the clock looked so much that I just left it on our countertop.  It has sat on the countertop, not working, for more than a year now.  It has been a bit annoying to look at it day after day and know that the time wasn't right, but like I said, I really love it.  On several occasions my husband has requested that I purchase a new clock, but I have not been able to find something that fits the space so well or makes me as happy to look at.
Then two weeks ago, while I was brushing my teeth, I found myself looking at the clock.  I was trying to figure out if there was some way to take off the clear plastic over the face without breaking it.  While I was staring at it I realized that the second hand was actually moving!!  How could this be??  I stared at it for a few moments checking to see if the second hand was actually ticking consistently or just ticking in place.  It was really ticking!!  I reset the clock from the back and it continued to work.  Well it's been two weeks and it is still working.  I have absolutely no idea how this has happened.  
No one else has touched it. How bizarre is that????
Maybe the clock just needed a rest (for over a year)?
It's definitely a mystery.
I won't look a gift horse in the mouth...
I'm thrilled it's working again.  

Hope you all have a great weekend!
-Judy
Pin It

Friday, September 16, 2011

Bathrooms

Roomspiration continues today over at Homemaker on a Dime with bathrooms.


 I thought this would be a great opportunity to give you a tour of the bathrooms in our home:
My powder room is my favorite.  I think it most accurately depicts my current style.  I recently redecorated the bathroom by adding crown moulding, new wallpaper, new lighting, two new mirrors, artwork, shower curtains and faucet.  The whole bathroom makeover was under $1000 (which included me hiring someone to hang the wallpaper and someone else to install the crown moulding).
The shower curtains I found at Home Goods and tied them back using extra silk fabric I had from another project.
I modified the existing light fixture.  All I did was turn the light fixture upside down (the lights used to face down), added new glass from Lowes and two magnet crystals to glam it up.

The mirror is from a local lighting store (a great source for mirrors).  The faucet is from Home Depot.  I LOVE the new faucet.
My daughter's bathroom came out adorable.  She wanted a pink and brown bathroom and I put it all together for very little money.  Before my daughter took over the guest bathroom it used to be painted yellow.  I left the yellow at the very top and painted the bottom Restoration Hardware (RH) Petal Pink and made a scallop using RH chocolate.  The window treatment is from Target's shabby chic line and I embellished it with a ribbon and fabric glue.  The "S" is from Home Goods.

Her crystal faucet was a mission to get.  After searching the internet forever, I finally found this gorgeous faucet at Faucetdepot.com.  For one reason or another it took almost 9 months for the faucet to arrive.  It was worth the wait.
The chandelier is from Home Depot for $99.  The towels are from Home Goods.  
When my daughter starting using the guest room bathroom, it was also time to make over the Jack and Jill bathroom, that the kids once shared, into a "boy's" bathroom.  I painted the bathroom, replaced the builder-grade mirror with a mirror we had in the attic and painted my son's initial on canvas.
Other simple changes included new hardware for the cabinets...
a new faucet from Home Depot...
new lighting...
and a new shower curtain and bath mat from Restoration Hardware Baby and Child.
I hand painted letters to spell out DREAM to finish off this bathroom makeover.
My master bathroom only had a mini-makeover when we updated our bedroom with colors in bronze, cream and robin's egg blue.
I like to roll towels to bring in my color scheme.
The cornice boards I made using MDF.  I covered them with batting and silk fabric (this is the fabric I used for the ties in the powder room bathroom).  I then hot glued trim to the cornice board.
Finally the last bathroom on this tour is our basement bathroom which I just made over.
As part of the makeover I painted the cabinet and mirror using Annie Sloan Chalk Paint.  
I am off to link up :


for Roomspiration.  I hope to see you all there with your bathroom posts.  

Don't forget Monday Roomspiration continues right here at DIYbyDesign.  I have the honor of hosting Guest Rooms...which is perfect since I have out of town guests this weekend.  Get your guest room posts ready for Monday.
Have a great weekend!

-Judy


Find unique ways for displaying your creative projects with wall hanging rails and hooks from AS Hanging

Thursday, February 17, 2011

The Master Bathroom

I thought it was about time I gave you a look at our master bathroom.  When we recently re-decorated our master bedroom (you can check it out here), I tweaked the master bath as well by getting rid of the purple accessories and changing it out to the color scheme to the same robin's egg blue, cream and brown we had brought into the bedroom.

Thankfully I had chosen a neutral wallpaper as well as neutral tiles.  It's good when you keep the most difficult things to change neutral.  That way you only have to change the accents to get a whole new look.  I love many things about my master bath.  For one...it's huge 11' x 13'.  When we built the house we asked the builder to vault the ceiling so the bathroom appears even larger than it already is.

That large expanse of mirror needs a frame.  I have gone back and forth between framing this mirror or getting rid of the mirror entirely and getting two smaller mirrors instead (like this picture from Pottery Barn below).  I'm still on the fence and because I can't seem to make a decision, nothing has happened.  It's on my "to-do" list.

Ok back to my bathroom.  Both the urn and the towel holder are from a home decorating party I hosted when we first moved into our home.  I don't remember the name of the company but I remember they had really different things in their catalog (way before Home Goods existed).  The artwork is from a local store that is now out of business (it was expensive at the time but I had been searching for a neo-classic look and this was perfect). A story about this picture -  one 4th of July my husband and I were watching TV in bed and all of a sudden heard this terrible crash in the bathroom.  Apparently our neighbors were throwing a big party and setting off fireworks, one of which hit our home and knocked this artwork off the wall.  Thankfully the frame wasn't damaged but the glass shattered all over and we actually had to replace the toilet seat which took the brunt of the damage.
Here is a close up of the urn.  I did the flower arranging and again, when I changed out the color scheme from purple to robin's egg blue, cream and brown, so changed the flowers.  I needed height as well as distracting from the fact that the toilet is behind that knee-wall.  

I love my vanity table and mirror.  I bought it at Fortunoff shortly after we moved in.  I usually end up standing in front of it when I put on my makeup because I'm always in a rush.  It keeps all my makeup organized.  I would LOVE to add a chandelier over my vanity table.  The problem is the vaulted ceiling...there doesn't appear to be access to the attic in order to install the box.  I will figure out a way.
So what do you do when you don't like the way your shower doors look?
You add a shower curtain to bring out more of your favorite Robin's Egg blue.
Shower curtain from Restoration Harware
For such a huge bathroom, the builder really skimped on the shower.  The shower is on the small side (not tiny but not huge either) with a basic door.  We thought about doing a frameless pull out door but there's really no room to pull the door out (too closet to the wall and the deck around the tub).  To just change it to a frameless sliding door doesn't seem worth the expense (it's actually close to $1000 - not enough bang for my buck on that one).  If we knew then what we know now, we would have changed the layout of this bathroom to have a better use of the space.  We just followed whatever the architect had drawn without changing anything except the height of the ceiling (our townhouse bathroom had a vaulted ceiling in the master bathroom which we loved which is why we did it here).
The tub area is large.  I made both valances in the bathroom.  The valances are MDF wrapped with batting and bronze silk fabric.  It is trimmed with a rope trim in the robin's egg blue, cream and brown.
I like to roll towels in a bathroom.  It gives than spa-like look and feel to the space.  I also love candles.
I found this clock at Michaels on clearance.  It was the perfect colors and look for the bathroom.
I have a thing for glass jars filled with soaps and bath salts and other "stuff" on a bathroom vanity.  These are a recent addition I picked up at Home Goods for a great deal (they were $12.99 and $14.99 respectively but I had a gift card so I didn't cost me a thing).
I like the look of the faucet with the hot/cold on it.
  The art is from Bed and Bath.
The tower is from Fortunoff.
The rug is from Target and pulled together all of the new colors for the bathroom.

Let me know what you think about this space.  I always love and appreciate your comments.
Don't forget the Winter Blues party is still going on.  Click here to join in the fun.  The link will be open through Friday.

-Judy


Related Posts Plugin for WordPress, Blogger...