Pages

Tuesday, May 22, 2012

Scrapbook Paper Tray

I love pretty scrapbook paper.  My new favorite place to but scrapbook paper is Home Goods. 
 I bought this 90 page book of scrapbook paper for just $5.99.  
With new paper in hand, it was time to come up with a new project.  
I took two coordinating sheets and glued them together using a glue stick
 to make a single double-sided sheet.
Then on all four sides I folded the paper in (about the width of a ruler).  
I also used the ruler to score the paper to make a perfect edge.
Once all four sides were folded in, I took the corners and punched a hole.
Using pretty brads I had in the house, I attached the four corners.
You could just call it a day here, but of course, I can't leave well enough alone.
Instead, I punched holes all around the top spaced approximately one inch apart.
Then with yarn I had (that matched exactly), I crocheted an edge all around the tray.
Once I was done crocheting, I didn't love how the corners looked poking out.
So I just tucked each corner into one of the holes I had made for the crocheting.

You could use these pretty paper trays for anything.  I am using mine on my bedside table and filled it with all the essentials I use each evening before I go to sleep.

I can't wait to hear what you think of my pretty paper tray.

Don't forget to stop back tonight for my Swing into Spring party.


The party opens at 8pm EST.  Hope to see you then.

-Judy
Pin It

Monday, May 21, 2012

Coping with the Mess During a Redesign

Today I'd like to share with you this insightful article written especially 
for DIYbyDesign by Anna Hicks.  Enjoy!

Renovating or updating a house can be a curse and a blessing. While it can truly transform it for the better, dealing with the mess and destruction can be a nightmare. One thing that constantly worries home owners is what to do with their belongings during the process so here are a few ways to minimize your concerns:

House 007
Source
Pack your belongings accordingly - whether you are packing glass or furniture, it needs to be done carefully. Don't let your glass objects rattle around without and padding and don't over pack boxes. For the sake of organization, pack objects that are alike in the same box and label it. Once you have completed a box, set it aside for safe storage. 

20060708 - Messy House 020
Source
Determine where you will store everything - if you will need access to things throughout the renovation, keep them close by. If you can live without them, consider having them stored off site and away from the action. Whatever you decide, make sure to keep track of where you put things so they will be easy to recover once the work is done. 

Storage filled with Picture Books
Source

Find self storage space - if you have a lot of stuff, letting a professional store everything can make it a lot easier. Most storage places can be rented by the day, week or month so no matter how long the renovation, finding a facility willing to accommodate your things should be easy. One benefit to using a facility over an attic or basement is that many facilities are climate controlled, guaranteeing you receive your belonging back the same way you left them. Also, many places are willing to pick your stuff up, thereby saving you a trip. 

Storage
Source

Plan for the worst - just because you are getting your kitchen redone does not mean that that room is the only one that needs to be packed up. More than likely, there will be workers trekking all through your house and anticipating where they will be walking will help determine what needs to be packed away. The worst case for a homeowner is to see some of their valuables get ruined that they thought were out of harms way. Don't take the chance, pack away anything you are worried about. 
Renovating a home can revitalize it, and taking the appropriate measures will ensure there aren't any surprises when the work is done. Find suitable storage space, whether in the home or outside of it, to prevent your belongings from being damaged.

Thanks Anna.  Hope you all have a great day.

Don't forget to stop by and enter my Shabby Apple $50 store credit giveaway here.

-Judy

Friday, May 18, 2012

It's Giveaway Time

It's giveaway time here at DIYbyDesign.  
With the warm weather upon us, couldn't we all use a new outfit?  When Shabby Apple contacted me and offered a $50 gift card to one of my readers, of course, I jumped at the chance.  
If you're not familiar with Shabby Apple, it's a 
wonderful site with so many gorgeous clothes and accessories to choose from.
Not only do they sell beautiful dresses...

they sell awesome fitness attire...
and stunning bathing suits.
They also sell the coolest jewelry.

Are you ready for your chance to win a $50 gift card?
Here's what you have to do:

Mandatory Entry - To enter to win this amazing dress, "like" Shabby Apple on Facebook and then leave me a comment saying you did.  

Optional Entry - Visit Shabby Apple and them come back and tell me in a comment which dress or item is your favorite.  

GOOD LUCK!!

The giveaway will close on Friday May 25, 2012 at 11:59pm EST.  You must leave a separate comment for each entry in order to maximize your chances to win. Must be 18 years or older.  Open only to residents in the 48 lower states.  If your email address is not linked to your Google account, please make sure to include your email in your comment so you can be contacted in the case you win.


Have a great weekend.

-Judy


Thursday, May 17, 2012

April Showers Brings May Flowers

Well...not really.  What really happened is the weather was gorgeous this past weekend and on Saturday my husband ran out to the nursery and bought a bunch of flowers for us to plant and spruce up the entire backyard just in time for our Mother's Day celebration.
  
Planting flowers in the pots around the patio was the quickest way to add color to the backyard.
All I did was take several hanging plants and transplant them into these pots.
It's probably a bit more expensive than buying flats of flowers, but time was of the essence, so we had no choice but to go for convenience rather than a bargain.
I used four hanging plants to fill these two planters.
I just love this shade of purple.
The rest of the yard really has bloomed with the April showers.
The pool was up and running this weekend, although the water was a bit cold, 
so the kids all jumped in the hot tub which can be warmed up much faster than the pool. 
Summer here we come!!

Make sure you stop back tomorrow as I have a very special giveaway planned.
Hope to see you all then.
-Judy
Pin It

Wednesday, May 16, 2012

Swing into Spring - It's A Party #65

Welcome to this week's Swing into Spring party.  As usual, last week's party was filled with the most wonderful and inspiring posts.  Here are this week's features:

HOME DECOR:

Life on Mars revealed her redecorated guest bedroom.  I hope you will stop by for all of the before and after photos.  You won't be disappointed.
Redhead Can Decorate revealed her totally renovated master bathroom.  You won't believe where this bathroom started...and it was all done on a serious budget.

FURNITURE TRANSFORMATIONS:

Oak Ridge Revival transformed this Goodwill ottoman find by painting it.  I didn't even know you could paint upholstery.  I hope you will stop by her blog for all the details.

At Home On The Bay upcycled a console table to create this TV stand. She combined three colors of Annie Sloan chalk paint to create this awesome color.

CRAFTY CREATIONS:
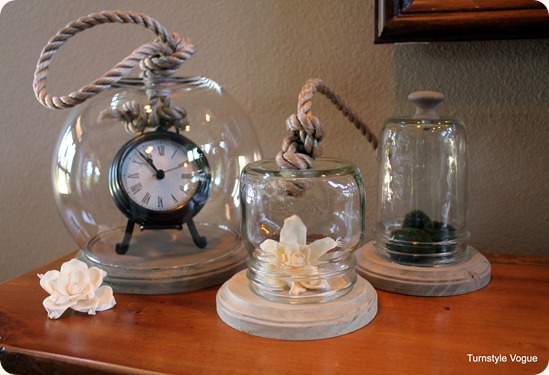
Turnstyle Vogue created these DIY rope and glass cloches.  I think these are the coolest creations.
MD School Mrs shares this super cute Kindle case that she made for a total of $3.
Now that's pretty awesome.

TASTY TREATS:

Cozy Home Scenes shares her recipe for sausage potato breakfast cups.
Breakfast is my favorite meal of the day...I would actually eat it three times a day.
Once Upon a Chocolate Life shared her recipe for triple chocolate cheesecake.
I could go for a piece right now.  Yummy!!


If you were featured, please grab an "I've Been Featured" button (you can now find my buttons by clicking on the buttons tab right under my header).  Now let's get started with this week's party.  I can't wait to see what you have been up to.  Link up anything you have been working on...home decor, sewing, crafts, organizing, baking, recipes etc.   I will keep this link open through Friday.


A few rules:
1.  Please become a follower (if you already follow me on Google, I would love for you to follow me on Linky Followers as well).  

2.  Please grab my party button above and display it either on your sidebar or somewhere in your post.  This way word can spread about the party.  The more people at the party, the more fun we will have.

3.  Please enter the link to your actual post, not just a link to your main blog page.

4. Please visit others who have linked up.   Everyone works hard on their projects and blogs...let's show each other some love by visiting each other.  Let's have some fun and hopefully make a few new friends along the way.

Ok...Let's Party

-Judy


Tuesday, May 15, 2012

Tips and Tricks to Hanging Artwork

Buying the perfect piece of artwork can be challenging.  Once you find the perfect piece, now you need to hang it.  There is plenty to consider when hanging artwork.  How high should it be hung on the wall?  What type of brackets should it be hung with?  Should it be hung alone or in a grouping?  
There are lots of options out there, even picture hanging wire, to hang artwork.  I usually hang artwork using picture hanging hooks.  They are much better than heavy duty nails or screws because the picture hooks go into the wall on an angle, securing them to the wall without much risk of being pulled out.  

Image
It's important to select the right picture hook for your artwork.  It's all based on weight.  They usually come in three sizes...one for pictures less than 30 lbs, one for pictures up to 50 lbs and one for pictures 50-75lbs.  No matter what the weight of your artwork, make sure you use two picture hooks.  This adds extra security as well as helps make your pictures hang straight.  As an added tip I use fun tac in the back of my artwork so that it doesn't move at all when dusting the frames from time to time.


One of the biggest mistakes people make when hanging artwork is to hang it way too high.  A good rule of thumb is to hang the artwork so that the center is  66" off the ground, 
which places it at eye level.   It's also very helpful if someone holds up the picture so that you can step back and see how it looks before you fill your walls with holes.  

When hanging a pair of works, treat them as one large piece and center them using the same rule of thumb.  If over a bed or sofa, keep in mind the scale of furniture in deciding placement.
Image
When hanging a collage of photos or artwork, you can start in the center and work your way out.
However, there is no hard and fast rule...in fact the best part is there are no rules.
You can do just about anything your imagination can come up with.
Source
The worst that can happen is you have to get out a little spackle and touch up
any holes you make if you have to move anything.

Hope these tips are helpful next time you go to hang artwork.

Don't forget to stop back tonight for my Swing into Spring party.


The party opens at 8pm EST.  Hope to see you then.

-Judy
Pin It

Related Posts Plugin for WordPress, Blogger...