Pages

Monday, September 30, 2013

Aunt Raquel's Homemade Microwave Brownies

My husband's Aunt Raquel is an incredible baker.  
So, when she sends me a recipe to try, I know it must be good.

Recently she sent me a recipe for homemade microwave brownies.  I have never made brownies from scratch.  I am more of an out of the box kind of baker.  Aunt Raquel is the real deal kind of baker.  She got the recipe originally from the newspaper years ago.  

 Here's all you need to whip up your own homemade brownies:

Ingredients:
1/2 cup margarine
2 (1-ounce) squares unsweetened chocolate
1 cup sugar
2 eggs
3/4 cup flour
1/2 teaspoon baking powder
1 teaspoon vanilla
1/2 cup chopped pecans or walnuts (optional)

Prep time - less than ten minutes 
Bake time - four minutes

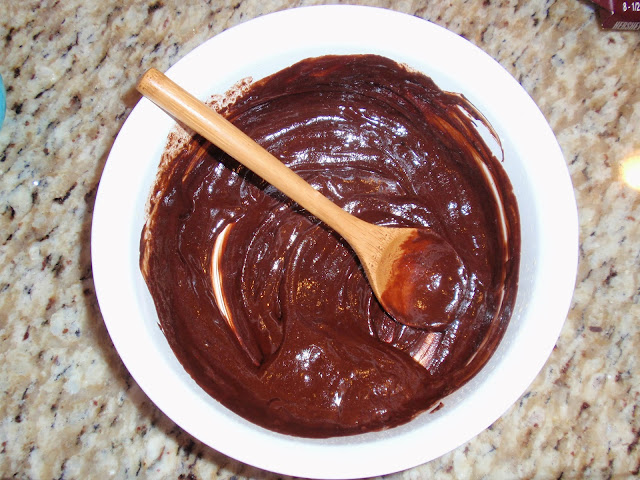
 Place margarine and chocolate in a 2 quart glass batter bowl.  Microwave on high 1 1/2 minutes or until chocolate is melted.  
 Using a wooden spoon, beat sugar into chocolate mixture.  Add eggs to mixture; beat well.
 Stir in flour and baking powder until well combined.  Stir in vanilla and nuts.
 Lightly grease an 8 inch square baking dish.  Pour bater into dish and spread it to a uniform thickness.  
 Microwave 4-7 minutes on high, depending on your microwave.  It is better to undercook brownies so that they will be tender and moist.  If you cook them too long you risk them being hard.
 It only took 4 minutes in my microwave.  The first time we tried the recipe we cooked them for 6 minutes in the microwave and created the consistency of a giant hockey puck.  We had to throw that batch away.  Less is more here for sure!!

Four minutes to create perfect brownies.
We garnished the top with extra chocolate chips because you really can never have too much chocolate.

If you don't have a microwave or prefer to use an oven, the batter can also be baked for 20-25 minutes in a conventional oven preheated to 350 degrees.

Yummy!
Hope you will try these.

-Judy

Pin It


Thursday, September 26, 2013

DIY Tissue Box Cover

Sometimes I just get in a creative mood and get on a roll of making things.  That's what happened last week.  I wanted to use my embroidery sewing machine, so I came up a project to do using it.  
I had some left over drop cloth in my stash.  I particularly like this drop cloth because it has good body and keeps it's form.  Even though it looks like linen, it's a little more substantial than linen.
Before cutting any of the fabric pieces, I embroidered the word Tissue onto my fabric.  
I cut four equal pieces of fabric 5" x 7" and sewed all four sides - right sides together.
I then cut a piece to fit the top, folded it in half and cut a curve in the middle.
I used more brown embroidery thread to sew around the hole I created in the fabric and sewed all four sides together.
It was that easy.  
If you don't have an embroidery machine, you can still create a tissue box cover in any fabric to coordinate with your decor.
Can't wait to hear what you think.

-Judy

Pin It


Wednesday, September 25, 2013

Fall into Fall - It's a Party #136

Welcome to this week's Fall into Fall party.  Last week's party was filled with so many great ideas and inspiration.  Here are this week's features:

HOME DECOR:
Our Home Away From Home shared her fall decor in the kitchen.  Beautiful!

FURNITURE TRANSFORMATIONS:
Tattered Elegance transformed French Provincial dining chairs into these beauties.

CRAFTY CREATIONS:
Scattered Thoughts of a Crafty Mom shared an awesome tutorial on how to make a travel document clutch.  What a great idea.

TASTY TREATS:
Jodie Fitz shared a crock pot recipe for pulled chicken.  Quick and easy - perfect fall meal.

If you were featured, please grab an "I've Been Featured" button (you can now find my buttons by clicking on the buttons tab right under my header).  Now let's get started with this week's party.  I can't wait to see what you have been up to.  Link up anything you have been working on...home decor, sewing, crafts, organizing, baking, recipes etc.   I will keep this link open through Friday.


A few rules:
1.  Please become a follower (if you already follow me on Google, I would love for you to follow me on Linky Followers as well).  

2.  Please grab my party button above and display it either on your sidebar or somewhere in your post.  This way word can spread about the party.  The more people at the party, the more fun we will have.

3.  Please enter the link to your actual post, not just a link to your main blog page.

4. Please visit others who have linked up.   Everyone works hard on their projects and blogs...let's show each other some love by visiting each other.  Let's have some fun and hopefully make a few new friends along the way.

Ok...Let's Party

-Judy


Monday, September 23, 2013

Using Garden Stools in Home Decor

Happy Monday.  It was a beautiful weekend here.  
One of my decorating crushes that I have had for a while now is using garden stools in my home decor.
Garden stools are not only pretty to look at, they are very functional as well.  They make perfect side tables and can add color, texture and pattern to any room.

The latest addition to my garden stool collection is this beauty I picked up at Home Goods.  It is the perfect blue green color and I paid a fraction of the price I saw it for in a home decorating magazine.  It works perfectly next to the chair I picked up on Craigslist (the one where I painted the upholstery).

I love this zebra print stool I use in my home office. This might be my favorite one.


The one in my living room is so pretty and unique with it's butterflies all over.  The colors work perfectly with my living room.   


The one in my guest room was my first garden stool purchase.  It makes a perfect side table.


Image
So far I have only used garden stools as side tables.  I love the look of two in lieu of a coffee table.
Image
Metallics are hot right now and this gold garden stool makes a great statement.

Image
My friend Heather, from At The Picket Fence, created this gorgeous look using a garden stool under a side table.  I am swooning over this one.

Image


I know I'm in good company when Sarah Richardson uses garden stools in her rooms.  

How about you?
Do you own any garden stools?

Can't wait to hear.

Have a great day.

-Judy

Pin It


Friday, September 20, 2013

Let a Turf Pro Provide The Backdrop for Your Future Baseball Pro


I'd like to welcome Anna Hicks who has written an article especially for DIYbyDesign.

Many homeowners have done amazing things to their interior spaces as well as to their outdoor living spaces. Everything from garage steps to patios can be transformed into works of art, all with some basic know-how and patience.
Lawns
http://www.flickr.com/photos/davydubbit/5124796142/in/photostream/

But when it comes to the yard--you know, that grassy space that isn't house and isn't patio--making it a work of art takes weekly attention. A repainted bedroom is finished in a weekend and needs no repeat work for years. A well-manicured lawn will need your attention for mowing every six or seven days, under normal rainfall conditions. And it will need just as much attention in drought-stricken areas, like the one encompassing hundreds of miles around Denver right now.

Wally and the Beaver sure had it easy with the old manual lawn mower. They grabbed it, made a few passes across the lawn, and were ready to go cause trouble with Eddie Haskell.
Once the 50's ended and everybody got into power mowers, things changed. A 120-pound teenager and a 20-pound tool didn't leave much evidence of their travels, but the greater weight of a motorized system created tire tracks on the grass during mowing.

Soon everything from Soldier Field to your neighbor's patch of paradise had wild, random imprints that were rather unsightly.

Lawns at Wisley
http://www.flickr.com/photos/david_wilmot/12963017/

It didn't take long for groundskeeper and homeowner alike to figure there had to be a better way. The time saved by using a gas-powered mower didn't look as important when the yard took on the appearance of a tractor proving ground.

Professional sports got on the case first. Before long, simple back and forth patterns were carefully maintained for football, baseball, soccer, and the like. Sweeping camera views from high elevation showcased their handiwork.

But the prison-stripe pattern soon fell away after one single grounds crew somewhere said, "We can do something prettier than this." 

Crews began angling the stripes and creating plaid-like patterns. Before long, complex designs and even team logos were appearing in the vegetation. And so began the one-upmanship of turf art.
As you and your ball-and-bat crazy kid view these ornate fields on TV, the thought probably crossed your mind: How cool would it be if my lawn looked like that?

It would be very cool, indeed...and very difficult. When the Rockies hit the turf at Coors Field, they are striding across a surface that takes hours to prepare. From any angle, the lines are perfectly straight and intersect precisely at 90 degrees.
Baseball Field
http://www.flickr.com/photos/kuroda/52043725/

That's the work of experienced people with commercial equipment on a very flat, very uniform surface. In other words, that's three things you probably don't have access to.
So maybe you can track down a landscaping maven. Denver lawn care professionals throw in shrub and tree care and even pest control to their services. In baseball parlance, they are 3-for-3.
When the DIY project you're into is one that you complete in a few days and enjoy for hundreds more days, it's reasonable to work your way through the process yourself. But if the work of art you want to create has to be created anew 20 or more times a year, you're far better off to let experts handle the canvas for you.

Thanks Anna.

Have a great weekend.
-Judy

Related Posts Plugin for WordPress, Blogger...