Pages

Wednesday, November 30, 2011

Fall into Fall - It's a Party #42

Welcome to this week's Fall into Fall party. I can't believe tonight is party #42.  Time really flies when you're having fun.   Last week's party was filled with inspiration and tons of great ideas.
Here are this week's features:

I love this little sheet music wreath created by Sweetwater Baby.  
How cute would this be to decorate the top of a special gift.

I really love this tray makeover that Turtles and Tails made.   It started out as a dollar store tray.  You must stop by to see the entire transformation.  
 Look at this awesome victrola turned wine cabinet created by The Project Queen.  My favorite part is the chalk paint...love the message.
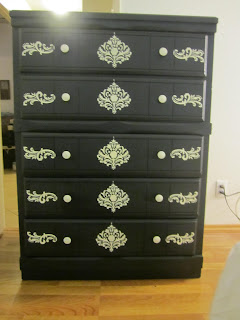
Here is another example of the power of paint.  This dresser makeover was done by California Dreaming.  This dresser started out not very cute at all...but look at her now!
This project really caught my eye.  Ann-Kay Home  made over her wood cutting board after it got a crack in it.  I love the new addition to her kitchen.
One more thing...next week in lieu of my usual Fall into Fall party, I will be hosting the Christmas Blogger Block Party with the theme of banisters.  Get all of your posts ready for an awesome party.  I also have a really amazing giveaway that will be associated with the party next week.
You won't want to miss it.


If you were featured, please grab an "I've Been Featured" button (you can now find my buttons by clicking on the buttons tab right under my header).  Now let's get started with this week's party.  I can't wait to see what you have been up to.  Link up anything you have been working on...home decor, sewing, crafts, organizing, baking, recipes etc.     I will keep this link open through Friday.


A few rules:
1.  Please become a follower.  

2.  Please grab my party button above and display it either on your sidebar or somewhere in your post.  This way word can spread about the party.  The more people at the party, the more fun we will have.

3.  Please enter the link to your actual post, not just a link to your main blog page.

4. Please visit others who have linked up.   Everyone works hard on their projects and blogs...let's show each other some love by visiting each other.  Let's have some fun and hopefully make a few new friends along the way.

Ok...Let's Party

--Judy

Don't forget to enter my Shabby Apple dress giveaway HERE.

Tuesday, November 29, 2011

Shabby Apple Dress Giveaway

With the holiday season upon us, who couldn't use a new dress?  When Shabby Apple contacted me and  offered a new dress to one of my readers, I jumped at the chance.  
  I just love all of the dresses at Shabby Apple.
 Shabby Apple is an online vintage inspired dress boutique.  They have so many gorgeous dresses as well as super cute things for the little girl in your life.   They even have fitness and swimwear!!

Shabby Apple asked me to pick one dress to giveaway...not an easy task.
So pretty for Spring...
I love this yellow dress as well.

Also gorgeous!

With all of these beautiful dresses to choose from, it was so difficult to pick just one. 

After at least an hour of searching, I finally decided on this beauty...


It's the Forbidden City dress (don't you just love the name).  Who couldn't use a new little black dress?  The perfect dress for any occasion...especially any holiday parties you have coming up. 

This is what the Shabby Apple Website says about the Forbidden City Dress - A billowy top blooms over a haute couture-inspired tulip skirt in the elegantly understated Forbidden City dress.  A scoop neck and cap sleeves offset the voluminous top which is cinched at the natural waistline, before descending into a pocketed tulip skirt. With all the luxuriousness of the Imperial era, and a silhouette to match, this 100% crepe de chine dress is finished with French seams and baby rolled hems.

Are you ready to win this dress?  
Here's what you have to do:

To enter - You must be a follower of DIYbyDesign.  If you are already a follower, please consider following me on Facebook as well.  

Mandatory Entry - To enter to win this amazing dress, "like" Shabby Apple on Facebook and then leave me a comment saying you did.  

Optional Entry -Post on Facebook, Tweet or Blog about this giveaway and leave me a separate comment letting me know that you did.  That's up to an additional three entries.  

If you can't wait to see if you won, or if you just want to do a little holiday shopping for yourself or someone else, head on over to Shabby Apple and use 
code DIYbydesign10off to get 10% off your purchase.

GOOD LUCK!!

The giveaway will close on Sunday December 4 at 11:59pm EST.  You must leave a separate comment for each entry in order to maximize your chances to win. Must be 18 years or older.  Open only to residents in the 48 lower states.  If your email address is not linked to your Google account, please make sure to include your email in your comment so you can be contacted in the case you win.
One more thing - there are no exchanges on the dress.  

-Judy

Monday, November 28, 2011

Peace, Love and Tennis

Hope you all had a wonderful holiday weekend.  
I am still busy trying to put the finishing touches on my daughter's new tween room.  
Yesterday I became inspired and created the second piece of art for her room.
I knew I wanted to do something with a peace sign to pick up on the bedding in her room, and at the last minute I decided to add the words...which are completely perfect for her since she spends over twenty hours a week playing tennis.
Here's how I created it:
I started with a blank canvas that I painted Restoration Hardware Baby and Child Petal Pink to coordinate with the focal wall in her room.  I then used a flower paper punch to cut out flowers out of scrapbook paper.

I traced around a salad bowl onto white paper (I taped two pieces together) 
to form a template for my peace sign.   

I used the template to lay my flowers around to form a perfect circle.  Something just wasn't right.  Her new walls are more of a teal and this blue wasn't really cutting it.  I didn't have any turquoise craft paper. What to do, what to do?  Then I saw it in the garbage.  The Tiffany's catalog.  PERFECT!  

I used both the envelope and the turquoise pages to cut out my flowers in the right colors.  
I had just enough pages to complete my project.  
I only wanted to cut out the flowers where I could get only teal (no jewelry on the flower...lol).  
The outside circle was from the interior of the Tiffany's catalog and the peace sign part was from the envelope (they are slightly different shades of teal).  I adhered it to the canvas using one of those double sided tape sticks (looks like the white out sticks).  It was much neater than mod podge.  Unfortunately I ran out of the tape before the end of the project and had to finish it using one of my kid's glue sticks.
It still needed something else...that's when I decided to add a second layer of flowers above the Tiffany flowers.  I love the depth and dimension it added.
Using my Silhouette machine and literally scraps of white vinyl I had left over, I added the words.
I love how it coordinates with the subway art I created last week.
This side of the room is done (BTW that's an optical illusion...the two pieces of artwork are hung completely evenly - I even went to remeasure after seeing this photo).

Can't wait to hear what you think.  
Hope to see you tomorrow...I have a great giveaway planned.

-Judy

Friday, November 25, 2011

Subway Art

I hope you all had a wonderful Thanksgiving.  We will recover from Thanksgiving today by putting up the Christmas tree.  Ha...not much of a recovery.  In the meanwhile, before my posts turn to Christmas, I wanted to share the Subway art I made for my daughter's new tween room.
Here's how I did it...
I started with a blank canvas that I painted with two coats of Restoration Hardware Baby and Child Petal Pink, which is the color on the accent wall in my daughter's room.
Using my Silhouette machine, I cut out all of the words I wanted to use onto white vinyl.
Then I used clear contact paper as my transfer paper.  The best thing about the contact paper is that I could continue to move the words until I got the right layout.  The only difficult part was lining everything up to make it into a perfect rectangle.  

Once I was happy with the placement of all the letters, I used a card and I rubbed over each of the letter and then carefully pulled away the contact paper.   I used this card which was from some vinyl letters I bought a few years ago, but you could just use a credit card or a popsicle stick.
Then using a frame I had in the closet, I put the canvas upside down in the frame and secured it using duck tape.  For now I left the glass in the frame.  I like how it looks, although it made it much more difficult to get a decent photo.
It goes perfectly with the new "tween" look of the room.
I love how it came out.

Let me know what you think of my version of Subway Art.  
Have a great weekend.  

-Judy

Thursday, November 24, 2011

Happy Thanksgiving

Happy Thanksgiving 
Image
I wish you all a blessed and healthy Thankgiving.  
-Judy

Wednesday, November 23, 2011

Fall into Fall - It's a Party #41

Happy early Thanksgiving!  Before we get started with tonight's party, I just wanted to take this opportunity to tell you all how thankful I am to have all of the wonderful friendships I have made through this blog.  I truly appreciate each and every one of your visits and comments.  This blog has become so much more than I ever could have imagined.  You all inspire me on a daily basis.
Now onto the party - Welcome to this week's Fall into Fall party.  Last week's party was attended in record numbers and was filled with so much inspiration.  
It's always so hard to pick, but here is this week's features:
This one really caught my eye.  It's a woodworkers transfer tool project done by A Lapin Life.   I love all things French.  Stop by her blog to see more.

Only a few days until Thanksgiving.  This gorgeous tablescape created by Raising Home is filled with  so many great ideas for my Thanksgiving table.

I just love the pops of aqua Simcoe Street added to her white and grey kitchen.  

I really love this stenciled office created by How to Nest for Less.   
I love what a great stencil pattern can do for a room.  
The Comforts of Home took this hutch from basic black to French Ooh La La, as she puts it.  I have to agree.  You must check out the before.   

If you were featured, please grab an "I've Been Featured" button (you can now find my buttons by clicking on the buttons tab right under my header).  Now let's get started with this week's party.  I can't wait to see what you have been up to.  Link up anything you have been working on...home decor, sewing, crafts, organizing, baking, recipes etc.     I will keep this link open through Friday.


A few rules:
1.  Please become a follower.  

2.  Please grab my party button above and display it either on your sidebar or somewhere in your post.  This way word can spread about the party.  The more people at the party, the more fun we will have.

3.  Please enter the link to your actual post, not just a link to your main blog page.

4. Please visit others who have linked up.   Everyone works hard on their projects and blogs...let's show each other some love by visiting each other.  Let's have some fun and hopefully make a few new friends along the way.

Ok...Let's Party

--Judy

Related Posts Plugin for WordPress, Blogger...