Pages

Showing posts with label reupholster. Show all posts

Monday, August 26, 2013

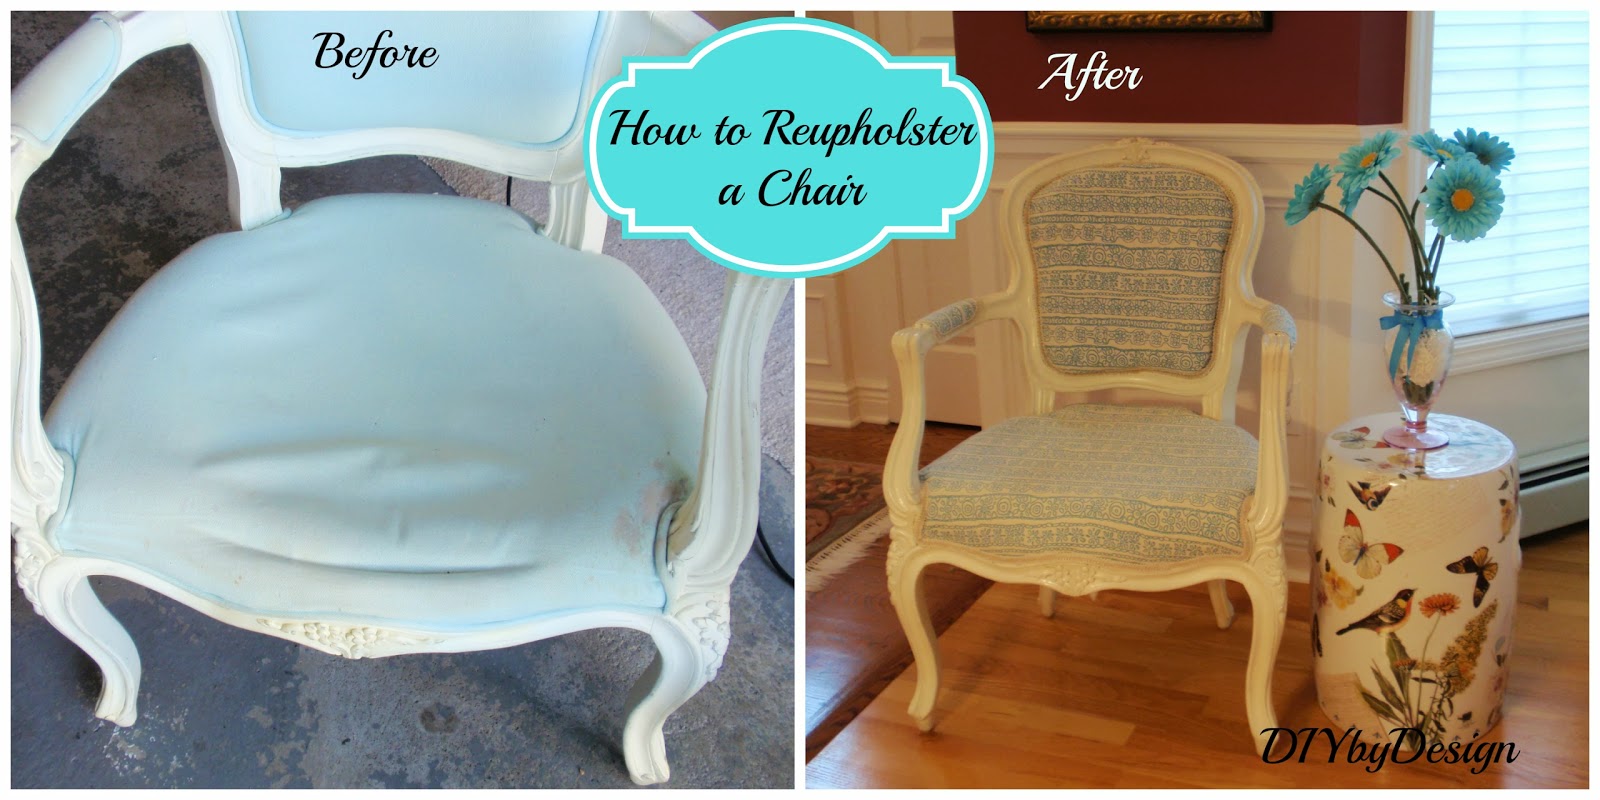
How I Reupholstered the Pottery Barn Teen Oh La La Armchair

I finally finished up reupholstering the Pottery Barn Teen Oh La La Armchair this weekend.  I bought it on Craigslist and it was in need of some major help.  
The seat cushion had collapsed and the fabric was badly stained.  
You can read here how I started the reupholstering process.  
Once I had the fabric stapled onto the chair I had to decide what type of trim I wanted to finish the chair off in.  The chair sat in the foyer while I decided and Sara has spent the last few days on the chair - she obviously approves of the new fabric.  Originally I planned to make custom cording out of the the same fabric.  However, I used just about a yard for the chair and didn't want to waste almost another yard of the fabric making cording since the fabric cost $27/yard.  Instead, I purchased a flat trim that worked beautifully.
It was gorgeous here yesterday so I glued the trim onto the chair outside.  Some people use a hot glue gun.  That works great, but you have to be super careful not to burn yourself.  I used fabric glue called Fabri-Tac.  I've been using this fabric glue for years and there is seriously nothing as amazing as this glue.  It goes on so easily and the fabric adheres immediately, just like a hot glue gun, without the fear of being burned.  
You can see how precise it allowed me to be with the trim.

Now my pretty little chair is done.  Not quite sure exactly where it is going since the chairs didn't work out as planned.  Apparently the Pottery Barn Teen Oh La La arm chairs have a seat height of only 16.5".  Most chairs are at least 18".  I didn't think that would make such a big difference but it does and the chairs are too low for my game table.  It's a perfect height for a tween or teen...clearly why it's sold at Pottery Barn TEEN.
I'm still super excited with how this chair came out.  
Can't wait to hear what you think.

-Judy

Pin It

Sharing with Savvy Southern Style

Thursday, August 22, 2013

Reupholstering a Chair - Part 1

I started to reupholster the Pottery Barn Teen oh la la armchair that I found on Craigslist.  
I found this awesome reversible fabric at Calico Corners.
I used the fabric I had removed as a template for the new fabric.
I think the key to reupholstering is having the right tools.

Clearly I must not have the right tools because I am having major issues with the stapling.  I first used my air compressor and the stapler I had with that, but the staples were way too big.  Then I went and bought an electric staple, but the staples weren't going all the way in and were actually causing damage to the chair.  

I am now back to using my basic hand-held staples with smaller staples and that is working better.  My hand is all blistered and sore, but at least the staples are going in.
How do I get myself into these things?

-Judy

Pin It


Friday, August 16, 2013

How to Paint Upholstery

Yes!  You can paint upholstery.  
Honestly this is one of the most amazing discoveries I have made in a while.  
I never thought it would work so well.

Let me remind you all where this project began.
Yep...I was able to transform Craigslist chairs that were badly stained from clearly way too many parties involving wine.  

It was really very easy.  

All you need is:

Latex paint in your choice of color (I picked a color close to the original fabric color)
Fabric Medium (I used Martha Stewart fabric medium from Michaels)
Water
Sponge brush
spray bottle with water

I mixed equal parts of paint, fabric medium and water and mixed it all together in a plastic cup.  It will be extremely watery, but that is the right consistency.  Spray the upholstery with water until it is fairly wet.  This will allow the paint to be absorbed in the fabric rather than sit on top of the fabric.  Then just paint the fabric.  I used a wide brush and brushed along the grain of the fabric.  I used a smaller sponge brush for the cording along the edges and I wiped up any paint that dripped on the wood as I went along.  
This is what it looked like after one coat.  I did the same with the other two chairs.
I let the paint dry overnight and the next day mixed up a second batch of paint, fabric medium and water...again in equal parts.  I sprayed down the upholstery again with water and painted a second coat.
I let that dry overnight again. 

You can see that the wood had yellowed in many spots on the chairs, so after the second coat of upholstery paint dried, I painted the wood using Annie Sloan old white and then finished it off with a clear wax.  
After everything was dry, I went back and used a 220 grit sandpaper and lightly sanded the upholstery focusing on any rough spots I found where the paint didn't soak in as well.  

The fabric is surprisingly soft and doesn't feel at all like I painted it.  It almost has the feel of drop cloth fabric, but a little softer.  I can't get over how well it worked.

Has anyone else ever painted upholstery?  If you haven't, you have got to try it.

Can't wait to hear what you think.

Have a great weekend!

-Judy

Pin It

Monday, August 12, 2013

Craigslist Find Gone Bad Then Good

I had several names swirling in my head to name this post.  Another fine mess I've gotten myself into, or Why don't I listen to people, or Seriously what was I thinking.  It all started last week when I was scanning Craigslist.  I was searching for chairs I could recreate for a game table I want to have in our basement family room.  I came across four Pottery Barn Teen Oh La La armchairs.  They were listed for $200 and I offered $100 for the four.  We ultimately agreed on $160.  They were admittedly badly stained and on one of the chairs the seat was sunken.  They would definitely need reupholstering.  I asked friends and family and pretty much everyone advised me not to buy the chairs.  Did I really need to take on such a large project?  For one week I kept thinking about the chairs.  I could picture how beautiful I could make these chairs.  So on Saturday I went into the city to pick up the chairs.  
I did ask the seller how these chairs could possibly have gotten so abused in such a short amount of time.  She was young and living in the city and she said that her sister liked to have parties.  Ya think???  The whole car ride home I had buyer's remorse.  This was going to be a big job.  
I decided to start with the worst of the chairs.  
I took it apart and saw that the webbing had totally sunk.
I re-stretched it and stapled it back into place.
I then flipped the cushion and started to pull off the rest of the upholstery.  Several hours later all I had was blisters all over my hands and was struggling to get off the rest of the upholstery.  Now I seriously wanted to cry.  I was so annoyed with myself for not listening.  Why do I ask for advice when I don't listen?  Ugh!  I walked away from the project and started to think....and think.  
I decided to try to clean the upholstery.  After an hour of scrubbing, it didn't look any better, and now was wet.  So I walked away from the project again, and started to think again.  

Then it hit me.  I searched on the internet for painting upholstery.  I remembered seeing this somewhere.  I read every tutorial I could and they all said basically the same thing.  I just needed latex paint, fabric medium and water.  I had everything I needed in the house.  I decided to test it out on the fabric I had removed from the first chair.  To speed up the drying process I used a hairdryer.  It felt soft and the coverage was great.  So I went to the other three chairs.
Here's what they look like after just one coat of paint.
Wow, right?  I kept saying to myself that I was so clever.  The truth is if I was so clever I should have figured this out before I completely stripped the first one.  I still will have to do something with that chair. 
I am definitely hopeful.  I am letting it dry overnight and then will paint it with a second coat.  If this is successful I will definitely post a full tutorial.  If it's a bust, I'll let you know that as well.  Stop back tomorrow to see how my Craigslist chairs turn out.  
-Judy

Pin It

Thursday, April 4, 2013

How to Reupholster a Chair

I want to create a game table area in my basement.  I am on the hunt for two chairs that I can completely transform for this area.   About a year ago I made my first Craigslist purchase.  It was a great chair that needed an update.   I transformed it using chalk paint and a drop cloth.  Reupholstering is a little time consuming, but not really hard.   Here is the full tutorial. 

My first chalk paint project is finished.  I am very happy with the results.  This project started with an awesome Craigslist purchase.   $20 - what a deal!
photo from Craigslist
The chair had some great bones.  I started this project by stripping the chair of all fabric.  It wasn't easy...it had nailhead trim all over it.

It was at this point that the fun began.  I had ordered Anne Sloan's chalk paint from Robyn Story Designs, a retailer in Florida.  They were awesome to deal with...I ordered late on a Friday afternoon and received my Anne Sloan paint, waxes and brushes by Wednesday morning. Don't you just love instant gratification?  If you are in the market for chalk paint, you should call Robyn Story Designs...they have inventory of Anne Sloan paint and waxes and are so helpful on the phone.
I started by painting the chair a combination of Duck Egg Blue with highlights of Old White.
After painting the entire chair, I used the clear wax.  I had ordered the wax brush, but because this chair had so much detail, I found it easier to use a rag to apply the wax.  I will use the wax brush on my next project.


You can see in the above photo that when you first apply the clear wax it slightly darkens the paint color.  However, once it dries, it lightens up again.
I tried to get a close up of what it looked like when I went to sand it to start distressing.  I think this is where you can really see the benefit of chalk paint vs. latex.  You know when you go to distress latex how sometimes it doesn't evenly sand off...or it will peel?  That doesn't happen with chalk paint.  It's super easy to distress and even easier to control how much you want distressed.  One tip...definitely wear a mask when you sand.  There is definitely more dust that with latex (however, less after waxing than before...I had sanded some before and then it's like clapping erasers together).
I also ordered the dark wax.  I used this extremely sparingly.  I again used a rag, dipped it in the wax and then wiped off most on a paper towel before applying it to my chair.  I just wanted to give some dimension to the detail...not totally change the color.
I had saved all the pieces from when I took off the original upholstery.  Makes it very easy to use it as a pattern.  I used foam I had for the under cushion.
Using my electric bread knife, I cut the foam to size easily.
I used a drop cloth I purchased from Home Depot as my fabric.  I cut a piece a little larger than I needed and laid it over the seat.
  Using the air compressor staple gun I got for Christmas...

I started stapling...
...and stapling.
Once it was stapled all around, I cut away the excess fabric.
I then cut out the fabric for the arms and the back and front.  I added foam and then stapled it all around.
Again, I cut away the fabric.  It doesn't have to be perfect...the trim will cover all of the staples.
For the back I started by stapling the fabric from the front.  I cut away all the excess.
I then added a piece of batting.
Then I added the cardboard (I used the same piece I had removed...it was still in good shape), then the foam, more batting and then the top fabric.  Yeah...this part wasn't so easy.  With that many layers it was hard to get it all to line up.  However, after I got a few staples in, I was home free.
It was now time for the trim.  I bought the trim from JoAnn's for $0.99/yard and then someone handed me a 10% off coupon when I was checking out, so I only paid $0.89/yard.  I bought eight yards ( I had about a yard left, but my rule of thumb is to always buy more than less...nothing is worse than having to go back out when you are in the middle of a project).
Using my hot glue gun and my scissors (rather than my fingers to push it into place) I attached the trim.  If you've ever worked with hot glue you know that you can burn your fingers so easily, so I like to use my scissors...the glue peels right off the scissors.
I'd like to say I was done at this point, but I still had to make the box cushion for the seat.  Again I used the old fabric as a pattern and cut out a front and a back to the seat cushion and the side panel.  I also made cording to coordinate.
I pinned and then sewed the three layers together.
Here is the final product.  I love how it came out.
I added the pillow as a final touch.
Remember this pillow?  I made it out of two dinner napkins.  All I did to make it fit the new chair was open up the pillow, remove the insert, add a smaller insert and sew a smaller seam.  The width of the pillow stayed the same.
So what do you think of my first attempt at re-upholstery?  It's the perfect addition to my guest room.   I have to be honest...it was so much work.  It took way longer than I ever anticipated, but I love the result.  Have you reupholstered anything lately?

-Judy
Pin It

Related Posts Plugin for WordPress, Blogger...