I kept myself busy this past weekend making pillows. My parents asked me to make them two neck roll pillows for their bedroom.
These neck rolls are so easy to make (also called bolster pillows). It took about a half hour to make both pillows. Originally they wanted two to put on their bed.
But, when they got this chair, they moved one of the pillows onto it instead. You can check out how we framed the mirror behind this chair
here.
I started with a neck roll form and measured around it and also measured the length. In my case the measurement around was 19" and the measurement from left to right was 14".
I cut my fabric 14 1/2" x 19 1/2" (the 1/2" being added for seam allowance). I like to use a square to mark the back of my fabric. This is the way I can insure straight lines.
To create the sides, you need to measure the diameter of the side. Mine measured 6". This meant half the diameter was 3". I added 1 1/2" to this measurement to fold over to make the pocket for the ribbon to go through. So the total for each piece would be 4 1/2" x 19 1/2" - I cut two pieces that size.
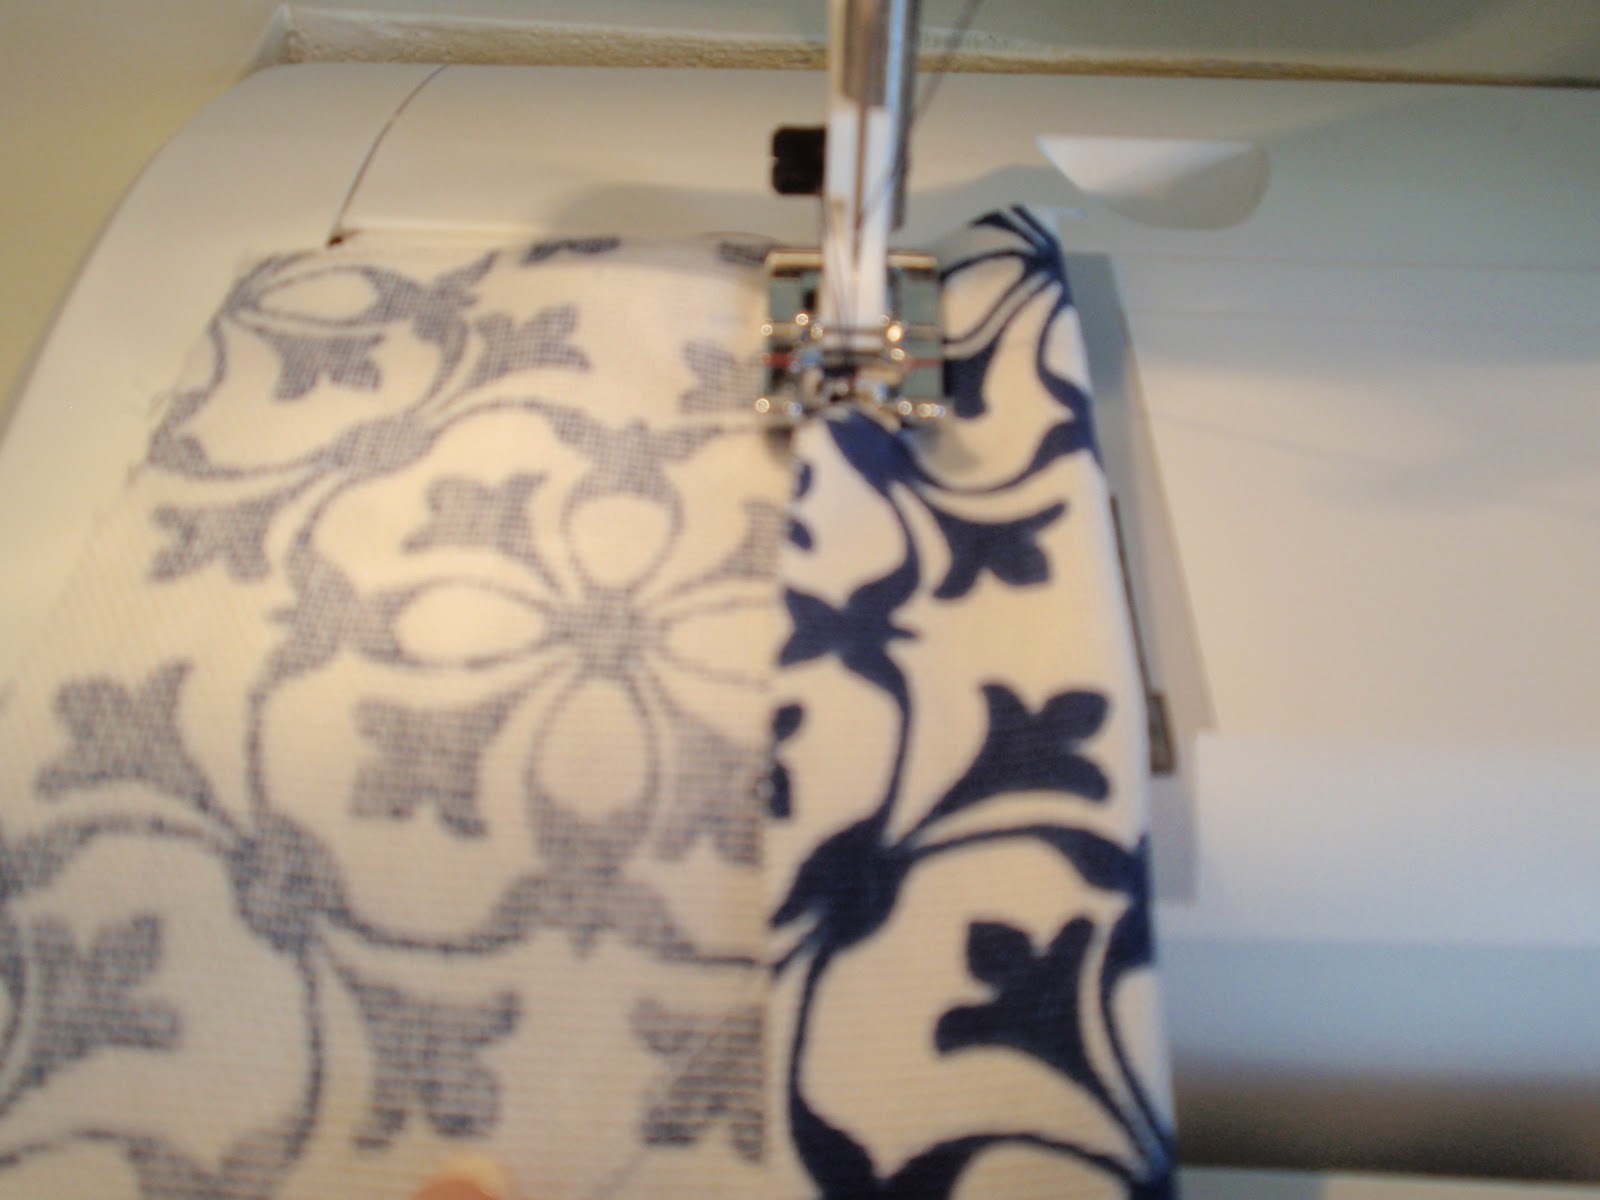
On each of those side pieces, I fold over the long edge about an inch or so (enough to be able to have ribbon put through.
Then with right sides together I sew the 19 1/2" ends together. Notice that the pocket that was just created it toward the center (that way when it is all on the right side, that will be the end).
Now is the time to add any embellishments. I sewed grosgrain ribbon onto the two seams I created when adding the end pieces.
I simply sewed around all four edges of the ribbon.
This time I left it at that because the fabric was a busy enough. You could add anything else you want. I folded the fabric in half and with right sides together (and making sure that the ribbon lined up together) I sewed it together being careful not to sew through the two pockets for the ribbon to go through.
Here is the old pillows I had made them (I just took the inserts out to make the new ones). You can see that I added a center band to this one, as well as a ruffled edge. This time they wanted something a bit more streamlined.
Once together, I took a safety pin and pinned it onto the ribbon. Then I threaded it through the pocket I had created on each side. Here's a tip - the larger the safety pin the easier it is to thread it through your pocket. This was the only pin I could find and it kept opening up and going through my finger...a little frustrating.
This is what it should look like when you have finished threading the ribbon through the end.
Simply pull the ribbons and tie a bow.
Simple as that. I love how it came out.
It looks perfect on their new chair. Let me know what you think. I always love and appreciate your comments.
The Swing into Spring party is still going on. You can click
here to join in the fun.
-Judy


65 comments:
Fantastic Pillows! I need to make some of these, they add so much to the room!
Thanks for the neckroll pillow tutorial. I can’t wait to attempt this myself. Your bedroom is beautiful, by the way. I have scheduled a feature of the neckroll pillow tutorial this morning for my readers at Extreme Personal Measures.
Denise
Extreme Personal Measures
Love these pillows! The fabric is so pretty! It looks great on the new chair. Thanks for sharing.
These look fantastic Judy! I love that fabric and this was a great tutorial. I tried to make some bolster pillows when I first started sewing but was clueless how to finish off the ends so I just gathered each end together and put a little tassel around it! :-) Now I know how to really do it!
Vanessa
Great tutorial, I love the fabric. Bolster pillows are so pretty anywhere. Hugs, Marty
Hi Judy! Thank you so much for stopping by my blog and for adding yourself as a follower also. I am now following you too:)
I wish I could sew but I'm hopeless at it! Your pillows are gorgeous:)
Judy, thanks for stopping to visit me and leaving such kind words! love your pillows! Now I am your newest follower.
Judy, those look beautiful! I totally forgot about how to make a rolled pillow, the tutorial was so informative with great pictures. It reminded me on how easy they really are! I love that fabric by the way, what is the name of it? The room is just beautiful,you are doing such a wonderful job.
So excited to make one of these- I love neck rolls and have recently learned how to sew. Bolster pillows really make a great accent anywhere!
Your pillows look nice. And easy to make! I might have to try it, although I'm currently working on a never-ending crocheted pillow project.
Thanks for sharing! What a great tutorial. Someday I hope to make some of my own. Any suggestion for where to buy the form?
Love the pillows! Thanks for your comment on my blog I'm following you back!
So cute...I don't know that I could make these in 30 minutes like you can! I'm new at sewing, so this tutorial is fab!
They're lucky to have you! I can't sew a stitch, sorry to say.
"/
You are so good working with fabrics. Loved the tutorial. Judy thanks for sharing in my coffee chat, loved it! Never would have thought you for a soap opera star:)
this is so great!!! and you made it look so easy..
Great tutorial..
Oooo!! I LOVE neck pillows and these look so easy to make. Can't wait to break out the sewing machine. Thank you!
I would love to have one of these on my bed. One of my grandmothers had one and loved it.
Love it! I can't wait to try making a couple of my own!
lovely!
I would love to have one, but I just don't do well with sewing or crafts, or just about anything except horses and cooking!
Those are quite cool, though!
So very pretty! And that mirror...WOW, I'll have to head over to that post too :) Thanks for visiting my blog too...have a great weekend! Laurel@chippingwithcharm
Hi there, I needed this neck roll pillow tutorial. I have some burlap that I think I will use for it. Thanks for stopping by my place and following. I have followed you for quite some time because I love stopping by over here.
Actually, I have this down pat. I have made MANY neckroll pillows over the years to carry with me in the car when Rod decides we are taking a car-trip!!
Thanks for visiting my blog Judy, I'm now following you too! I love you bedroom and the mirror is gorgeous!
Hi Judy! Thanks for the sweet comment you left me. I am now following you and I am amazed at your pillows! They are beautiful. Thank you so much for the tutorial and I love your blog. I love my droid but I have been having problems with the wifi not working, have you had problems with yours?
Love them! And that fabric is amazing too. Thanks so much for linking them up Judy!
Well done! It does indeed look great on that chair.
Thanks for your comment on my blog!
These are so pretty! Wish I had a sewing machine! Visting from Fireflies & Jellybeans =)
-caroline
http://cwfrosting.blogspot.com
Wow these turned out so good. Really they are so pretty and your tutorial is so good I think I could even make these.
Thank you for leaving a lovely comment on my blog and becoming a follower. I will become a follower of your blog too. Sue x
Thank you for your lovely comment!;)
And than`s for following ;)
I´m follow you back.
Love this pillow tutorial!
They`re looking great;))
Lovely greetings...
http://pudel-design.blogspot.com/
Hello Judy,
Thank you for your comment and becoming a follower! I am now following you. The pillows you made for your parents look great! As a big fan of blue and white, I love the colors of their room. I am currently redoing my master bedroom and will need bolster pillows for it and your tutorial makes it sound like something even I can do!
Thanks!
~ Tracy
Great tutorial, Judy! I have printed it out as I have two really large bolsters I use at each end of a day bed that I've been wanting to cover for years. Wasn't really sure how to go about doing it, but now I know! Thanks!
Beautiful! A great tutorial!
great tutorial!
I love the navy blue and white! That is what we are going to be doing our bedroom in! I bought that exact same fabric to use in the bedroom as well for pillows!! This is awesome. I always wondered how these were made! You did an awesome job!
I love the fabric you chose...they turned out great!
Thanks so much for linking to "20 Below Thursday"! :)
love the color of the fabric,
cool post.
Love the darling neckrolls you made- those ribbon ties are so charming! Thanks for sharing at FNF! :)
this is a great tutorial...love how they turned out...and i bet your folks did too...thanks for the awesome tute and for sharing on fridays unfolded!
blessings,
alison
You made this look easy, which means it's probably really too complicated for my basic sewng skills.
They look so charming and professional.
I really like the ribbon ties, too! You are incredibly talented.
Thanks for sharing.
A+
These turned out just great! New follower here!
excellent tutorial! I was able to follow them easily to make my own. Thanks.
Great tutorial! Neck pillows have so many uses! I love to use one for under my knees when I am laying on my back.
Found your instructions and couldn't wait to try it. Made mistakes on the first one with the material pattern but the second pillow went really well and much faster. Thanks so much
Came upon this today and used your tutorial. Just wanted to say thank you so much for sharing your wisdom.
Thanks for a great tutorial, I made this today, even had the same fabric in green! Super fast and easy, my son immediately asked for one for his room...different colors of course.
How clever with the ribbon cinching on the end. It negates the need to cut a circle which could freak out new sewers (or those not mathematically inclined)! Thanks.
Thank you so much for the pattern! I love that I can take the case off and change them whenever!
I made mine shabby:
http://thecraftyclassroom.com/blog/2012/09/16/sewing-a-pillow/
Thanks again!
Blessings,
Valerie
your tutorial is so beautiful! m really impressed you, you did an amazing work.Internet based furniture company
Wow! What a great tutorial. Definitely going to make my own now. Thanks!
Roller Coverings
tangential belts
, leather belts
flat belts
Your post is really good providing good information.. I liked it and enjoyed reading it. Keep sharing such important posts.oriental rugs for sale
What’s up, every time i used to check blog posts here in the early hours in the break of day, for the reason that i enjoy to gain knowledge of more and more.
Also Visit This Link: Kids Website Design for pediatricians.
Thanks for a great tutorial,
Bean Bag Bed With Blanket And Pillow
Furniture Stores In Denver Co
Wooden Table And Chairs
This is good! Great tutorial for Pillow. Now I know how to do this one. Love it. Thanks for sharing this one. Keep blogging.
Zeel Kitchens
Wow neck roll tutorial thanks for sharing.Nice information, valuable and excellent design, as share good stuff with good ideas and concepts, Got lots of great information and inspiration, both of which I need, thanks to offer such a helpful information here.The Web Designer in NYC provides good design service.
Follow football news, football results according to international football. ติดตาม ข่าวฟุตบอล ผลบอล ตามทีเด็ดฟุตบอลต่างประเทศ
Suggest good information in this message, click here.
redwoodcoastrealestate
lelandbchapman
Very sophisticated tutorial. The neck roll pillow for the bedroom you designed and DIY you were incredibly beautiful. Those are looking so so nice and eye-pleasing. I love your brilliant job. I can also recommend some pillow ideas here for the new pillow design hunters and those are pillowcase for body pillow, white body pillow, euro sham pillow cover, and sham vs pillow. Perhaps these will be also helpful for the pillow seekers.
Let’s understand the difference between Microfiber sheets vs cotton! Hence, microfiber sheets vs. cotton are a vast topic.
Nice articles and your information valuable and good articles thank for the sharing information Cervical Pillow
Nice articles and your information valuable and good articles thank for the sharing information half body pillow
Look into the Everlasting Comfort Knee Pillow. It has memory foam and a strap so it stays in place overnight. My lower back pain has improved a lot since using it!
https://www.rinipo.com/
Post a Comment