Pages

Friday, February 8, 2013

How to Pick the Perfect Paint Color

Painting is one of the easiest and most inexpensive ways to transform any room in your home.  It can create a completely different mood in a space.  So often people are stopped in their tracks when it comes to picking a paint color.   Here are some tips and tricks I use to find the perfect paint color.

Start with Inspiration
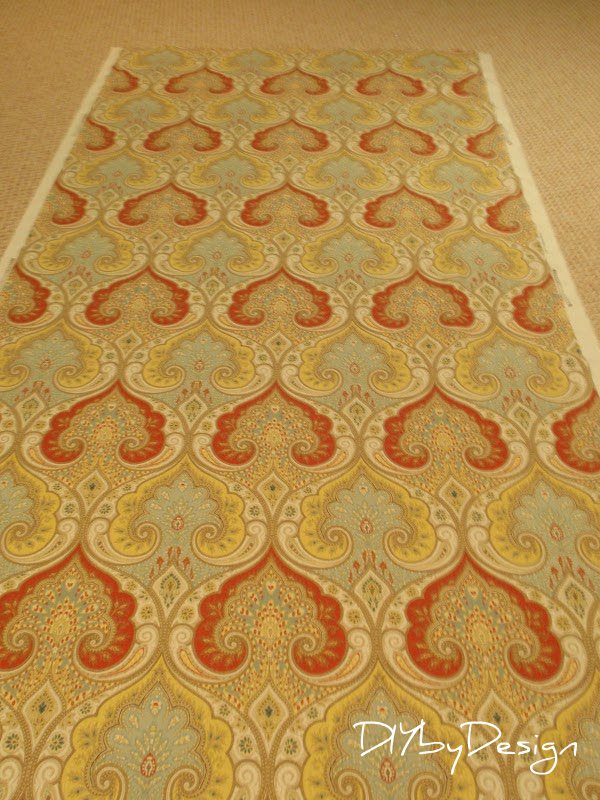
All of my projects begin with an inspiration.  The inspiration could be a fabric, art, or an area rug.  In the case of our basement, the new color scheme comes directly from the drapes fabric.
If you pick a fabric that has multiple colors, you get an instant color scheme.  You know the colors look great together...they did put them all together in a fabric, right?  The same holds true of a color rich area rug...it too gives you an instant color scheme. 

DECIDE THE MOOD

What is the mood you are trying to achieve in the room?  Do you want something warm and cozy?  Maybe you want something energetic.  The color you choose for the wall will go a long way in defining the mood of the room.  


All of these colors are found in my fabric, however, each would create a completely different mood in our finished basement.

PAINT A SAMPLE ON THE WALL

There's no way around this one.  I have tried a few times to just pick a color from a paint swatch at the store and it rarely works out the way I would like.  The truth is the most beautiful color on a paint chip may be the most hideous color when actually on the wall in your space.

The primary cause - lighting.  Does your room have tons of natural light, or do you rely solely on overhead lights and lamps?  In the case of our finished basement, lighting is a real issue.  We are working on trying different lightbulbs for our recessed lighting, and the paint swatches I have painted on the wall change each time we try a different bulb.  I would suggest painting a sample on all walls as the lighting is going to change from wall to wall as well.  I would also suggest living with the color for several days, viewing it during the day and at night.  Trust me...the appearance of a paint color can really change based on the time of day.

Hope these tips help you next time you go to pick a paint color.

Have a great weekend.

-Judy

Pin It

Thursday, February 7, 2013

Remediation Starts

The mold remediation of the basement starts this morning.  
Check back tomorrow to catch up on the progress.

What I was planning on posting today just never got to happen.  Unfortunately my twelve year old daughter got hit with a nasty version of the stomach virus and we spent the night in the emergency room getting her rehydrated.  I can only pray that everyone else in my house stays healthy.   
Crazy night!

-Judy

Wednesday, February 6, 2013

Winter Blues Wednesday - It's a Party #103

Welcome to this week's Winter Blues Wednesday party.  Before we get to this week's features, here is what has been going on here at DIYbyDesign.
Come check out my tutorial on how to make your own DIY monogrammed letter.
I shared how unfortunately, we developed a mold issue in our finished basement.  The full remediation begins this Thursday.
Image
But with every negative I always try to find a positive.  In this case, the positive looks like it will be a full fledged craft/sewing closet for me post renovation.  Come check out all of my inspiration photos.

Now let's party.  Last week's party was filled with tons of great ideas and inspiration.
Here are this week's features:

HOME DECOR:
Inspired Living shared a home tour of her renovated home.  Each room is more gorgeous than the next.
PBJ Stories shares her kitchen renovation and proves that you can upgrade your kitchen without breaking the bank and without a full gut job.  Stop by and check out all of the great photos and advice.

FURNITURE TRANSFORMATIONS:
Create Inspire transformed an old, beat up desk and turned it into this beauty.
Smart Girl Style transformed a basic Ikea lack table and made it into a padded and upholstered bench. 
 I love a great Ikea hack project!  
House Dressing  transformed an old vanity into this beauty.  I hope you will check out all of the other changes she made in this bathroom...mostly using paint.

CRAFTY CREATIONS:
SewCanDo shares an awesome tutorial on how to make a fabric take-out box.  This is such a super cute project.  I pinned this and can't wait to give it a try.  
Alderberry Hill shares a tutorial for these super cute Valentine's Day treat boxes.

TASTY TREATS:
Life in my Empty Nest shares a recipe for these heart cookies.  Perfect for Valentine's Day!
Looking for a great soup recipe?  Check out the italian soup recipe posted by Tales of a Trophy Wife.

If you were featured, please grab an "I've Been Featured" button (you can now find my buttons by clicking on the buttons tab right under my header).  Now let's get started with this week's party.  I can't wait to see what you have been up to.  Link up anything you have been working on...home decor, sewing, crafts, organizing, baking, recipes etc.   I will keep this link open through Friday.


A few rules:
1.  Please become a follower (if you already follow me on Google, I would love for you to follow me on Linky Followers, Facebook, Twitter and Pinterest as well).  

2.  Please grab my party button above and display it either on your sidebar or somewhere in your post.  This way word can spread about the party.  The more people at the party, the more fun we will have.

3.  Please enter the link to your actual post, not just a link to your main blog page.

4. Please visit others who have linked up.   Everyone works hard on their projects and blogs...let's show each other some love by visiting each other.  Let's have some fun and hopefully make a few new friends along the way.

Ok...Let's Party

-Judy

Tuesday, February 5, 2013

Craft Closet Ideas

Since the basement is about to undergo a major renovation (you can read all about it here), I have been brainstorming different ways of better utilizing space.   One space that I would like to consider using in a different way is my kids toy closet.  
This was the toy closet before we emptied it this weekend, and the plan was that this would be the toy closet after the renovation.
  There are other closets in the basement where the toys could relocate (plus I plan on editing what goes back into the room).  After emptying the toy closet, I started to dream of what else it could become.
Image
I would love a craft/sewing closet.  For years I have wanted a craft/sewing room, but have always found it difficult to justify changing an entire room for this purpose.  How great would it be if I could have all of my craft and sewing supplies together, rather than in multiple closets and drawers throughout the house.  There is already a bare bulb in the closet which I could easily switch out for a chandelier.  I already have a fixture that has been screaming for a makeover, that I know would be perfect.
Image
The Container Store has their 30% off sale going on until next Tuesday.  
This would be a perfect time for me to set up an awesome craft/sewing closet like this.
Image
There are bits and pieces of all of these inspiration photos that I would love to use in my closet.
Any transformation will have to begin with a fabulous backdrop, like the beautiful wallpaper used here by Remodelaholic.
Image
Image
My friend Ange, from the Blooming Hydrangea created this closet office from a closet who's before photo looks a lot like my before photo. I have always loved the stencil she did on the back wall.

Now I'm really starting to get excited about this project.
What do you think - good idea for a craft/sewing closet?

Don't forget to stop back tonight for my Winter Blues Wednesday party.


The party opens at 8pm EST.  Hope to see you then.

-Judy

Pin It

Monday, February 4, 2013

Opening Up a Can of Worms

A few months back our cat, Sara, got very ill, with acute kidney failure. She was in the animal hospital for over a week and ultimately we were called in when things took a turn for the worse, and given the option of putting her down.  I couldn't do it and refused.   You can read here how, only through a true miracle, she made a complete recovery.  While she was in the hospital, I was searching for reasons why our healthy five year old cat would suddenly get so ill.  I decided to call in a mold specialist to test our finished basement.  Over the past year or so the basement had developed a musty smell.  We finished the basement 11 years ago and never had any issues before this.  
I didn't expect them to find anything, and I was doing it more to make myself feel better.  Well, imagine my surprise when they found mold growing by the window.
Last year during Hurricane Irene, we had water pouring in from the gutter being clogged. We pulled the rug back and did everything that was supposed to be done to dry everything out.  When the mold specialist came he found that mold had developed behind the baseboard molding.  Still, not a big deal.  The specialist told air samples but told me there was nothing to worry about and that we could probably just replace the molding and everything would be fine.  Well a week later the mold specialist called and said that the air quality levels were off the charts bad!  He suggested we do a complete remediation.  Before going forward we attempted to go through our home owners insurance.  Guess what...mold is not covered under home owners.  Just super (with tons of sarcasm).  But the home owners did bring in their own mold specialists and their tests also revealed super high levels of mold in the air, including black mold.  Ugh, this was becoming a disaster. The drapes have to be removed and sent to the dry cleaners to make sure are free from any mold. 
They will be starting the remediation on Thursday.  The process includes cutting away all of the sheetrock within a two foot radius of any found mold, pulling back all of the baseboard molding and checking for mold elsewhere.  It also includes removing all of the carpet, creating a negative pressure situation in the basement and cleaning all of the air.  We have to empty out the basement almost completely.  This toy closet has a very musty smell too so I fear they will find mold in there as well.  
We emptied out this closet and are using this as an opportunity to go through everything and start to get rid of those toys the kids have outgrown.  Not such an easy process, especially with my kids, who seem to have an attachment to each item I propose throwing out.  Some they have no choice about, especially the bag of stuffed animals that we just can't take a chance and put back in the room after it is remediated.
The closet under the stairs was next to be emptied.
This closet is way bigger than we remembered.  It's going to be much better organized after the remediation too.  Those wires you see go to the equipment in the home theater on the other side of the closet.

This is what our theater usually looks like.  The theater has no air quality issues, so it will be exempt from the remediation and will act as a storage room for everything we move during the process.
Here's what it looks like after we emptied the basement this weekend. 
 UGH...it looks like an episode of hoarders.

As it turned out, the poor air quality in the basement had nothing to do with why our cat got so sick.  The basement is going to get almost a complete makeover due to this situation.  New carpet has been ordered and the painters are ready to go as soon as the remediation process is complete (about five days).  Our painters will also be responsible for repairing all of the sheetrock damaged during the remediation process.  All in all it will probably take about two to three weeks to complete everything and get the basement back to normal.  The hardest part about this entire thing is that Sara (the cat) is going to be displaced by the whole situation.  Although she has the run of the house during the day, her litter boxes are in the basement and she sleeps and eats down there as well.  We are concerned with how she is going to react to the whole thing.  Let's hope that she is not going to be too freaked out.  I'll keep you all updated during the process.  I can't wait until we get to the pretty part.

-Judy

Pin It

Friday, February 1, 2013

DIY Monogram Letter

Here's a fun and quick project I put together using things I already had in the house.
I already had the letter which I bought a while ago at JoAnn's.
I had decoupaged it once before, but it was time for a change.
I used the same music note wrapping paper ...
that I used for these candle holders.
Using Mod Podge, I adhered the wrapping paper to the letter.
I used the extra twine from my DIY Twine Pears and wrapped the letter K.
I then used a crocheted rose I made and added a button.
Simple, quick and super cute.
Have a great weekend!

What do you think of my DIY monogrammed letter?
-Judy

Pin It

Related Posts Plugin for WordPress, Blogger...